Once again I made a newbie-friendly and easy-to-follow guide for self-learners like myself. I’m not an expert, but I have enough knowledge to get the job done. So jump on in!
This time I made a step-by-step tutorial in building your own cloud store file hosting and sharing service using free and open-source software called Nextcloud. So in this post, I’ll teach you how you would install Nextcloud on your own and private server or VPS using Ubuntu 18.04 Linux Server.
Note: Throughout this post, I mean Nextcloud when I say NC.
Jump Links
- Setup Overview
- VPS Creation
- Installing Apache, MySQL and PHP
- Virtual Host Setup
- Manual Nextcloud Installation
Things Needed in Building Your Own Cloud Storage Server
Before going further with this guide, make sure you have the following stuffs hand. * Domain Name (if you don’t have it yet). Use a sub-domain to host your cloud server (i.e nc.chubbable.com) * Server or VPS from DigitalOcean * At least 2GB of RAM. A minimum of 4GB RAM if you want to use Online Office functionalities (Spreadsheet and Docs editing and sharing.) * At least 25GB of hard drive space. * Nextcloud software suite (server/client).
NOTE: Domain/Registrar Setup is not covered in this post.
What is Nextcloud?
Next Cloud – stylized as Nextcloud is a set of client/server software for building your own file sharing/hosting service and private cloud storage system. It’s like Dropbox, pCloud, Mega, Google Drive or OneDrive. However Nextcloud is a self-hosted solution, that is free and open source. It is the opposite of the aforementioned file hosting/sharing services, which come in a monthly paid plan. With NC, you only pay for the hosting service of your VPS or Dedicated server. Or you pay for nothing at all, when using within your LAN.
NC is an open source software licensed under AGPLv3, and constantly being improved and developed by Nextcloud GmBH and a community of volunteer developers.
NC is a set of client/server software that you can use in building a file sharing or hosting service or your private cloud storage solution. The client software is used to sync files across your devices, it can run on iOS, Android, macOS, Linux and Windows. The server software can only be installed on a Linux environment. However, you can also run it inside a virtual machine guess, where the host is either Windows or macOS.
NC is a fork of ownCloud by the original developer Frank Karlitschek. Frank (born 25 July 1973) is a German open source software developer living in Stuttgart, Germany. Fork in software engineering means a copy of a source code from a software package and development on it is independent. It becomes a separate piece of software,
Related to ownCloud: HTPC File Server Combo Using ownCloud
Personally, I’m using Nextcloud to share media files across devices within my LAN. I used it with Kodi and other Media Center App.
Various Ways of Creating a Nexcloud Instance
Building your own file hosting/sharing using Nextcloud is not limited to one option. There are several ways of setting it up depending on your environment, needs or technical skill.
Below are options in setting up your own Nextcloud Server:
Manual Installation on Linux Server
If you’re a bit techie, then probably you would opt to install Nextcloud on a dedicated server or VPS. You can host the server either on cloud or on a local machine within your local network.
This option in my opinion lets you have more control over the whole Nextcloud setup. You can configure it the way you want it, tweak your settings and a lot more.
Shared Hosting Installation
One easy way of deploying NC for online use is to set it up on a shared hosting service. You would only need a hosting account, domain name, NC files, database and kaboom! Done!
You won’t be going through the seemingly daunting task of manually installing NC from scratch.
You won’t need to install Apache, MySQL, PHP, modules and dependencies yourself.
In my opinion, this is not the best option. But for self-learners like myself, you can easily setup NC on a shared hosting environment. However, one caveat I found and why I mentioned it is not the best option is – server resources are limited or throttled once the server or your account had reached a certain threshold.
Nextcloud on Virtual Machine
Another easy way of building your own GoogleDrive or Dropbox-like service is through a Virtual Machine. You can do this on a Windows machine.
Tech and Me maintains a VM designed for less technical users to get Nextcloud up and running. It is built on Ubuntu Linux and is fully set up and configured with a secure SSL/TLS connection.
To get NC running, you just need to download the pre-configured VM and run it with VirtualBox.
Once caveat I find with this option is that, you can’t easily share your files over the Internet, especially if you’re your on dynamic IP address and you’re on a LTE network. Punching through closed ports and firewall can really be challenging for less technical users.
Manually Installing Nextcloud 13 on Ubuntu 18.04 Bionic Beaver
Setup Overview: How to Install Nextcloud on Ubuntu Server
Phase 1: Ubuntu Web Server Preparation
Phase 1 involves server preparation for Nextcloud’s exclusive use. Take note that only Nextcloud should only be the sole Web App running on your server. No other web app or whatsoever.
- Create a Droplet on DigitalOcean
- Setup LAMP Server
- Secure MySQL
- Setup Apache Virtual Host for Nextcloud
- Install Required Softwares/Dependencies
Phase 2: Nextcloud Installation
Phase 2 involves the actually steps in installing Nextcloud on Ubuntu Server. Below is the overview of the procedure.
- Download and extract Nextcloud Installation Files
- Copy Nextcloud files to your chosen web root
- Apply necessary file and folder permission to your web root
- Create DATA folder and apply proper file/folder permission
- Create Database for Nextcloud and a user for it
- Initiate installation wizard using your favorite browser
Phase 1: Web Server Preparation
I highly recommend that you use a sub-domain to host your NC, so you can still use your primary domain for other purpose (i.e Web Site).
Step 1: Create a Droplet on DigitalOcean
Login to your DigitalOcean account and create the server from your dashboard. See referene image below.
Reference Image 1:

Ubuntu 18.04 VPS Creation in DigitalOcean
Choose an image. Under Distribution tab select Ubuntu, then click on the drop-down button. Then select 18.04 x64
Reference Image 2:

Creating a Droplet in DigitalOcean
Choose a Droplet size. A 1GB RAM would be enough for this tutorial, only IF you are wanting to test the install guide. But for a production server with busy traffic and multi-user environment, I recommend to start with a 4GB Droplet for a decent and optimum performance. See reference image below.
Reference Image:

Choosing a Droplet Size in DigitalOcean
NOTE: If you’d like a GoogleDrive-like function, where you can share Google sheets and docs for team collobration, then a 4GB RAM is the minimum.
Install Collabora APP on NC, for team-based collab and editing.
Collobora is a for a powerful LibreOffice-based online office suite with collaborative editing, which supports all major document, spreadsheet and presentation file formats and works in all modern browsers.
Choose a Regions closest to your location:
- New York
- San Francisco
- Amsterdam
- Singapore
- London
- Frankfurt
- Toronto
- Bangalore
Add your SSH key. Not sure how to create and add your SSH? Then watch one of these videos:
Next, Choose a hostname. It should be a fully qualified domain name. In my example, I used nc.chubbable.com. This is the hostname of my server and at the same time, the domain name for my NC installation. See reference image below.
Reference Image:

Final Step in DigitalOcean Droplet Creation
Finally, click on the CREATE button and wait for the process to finish. Once done, take note of your server IP address. You’ll be using if when logging in via SSH.
Registrar Settings
Don’t forget to change yoiur Registrar setting and point your DNS Servers to DigitalOcean, or as instructured by whoever is your provider.
If using DO, go to your Registrar’s Admin Dashboard and change your domain name servers to the following:
ns1.digitalocean.com
ns2.digitalocean.com
ns3.digitalocean.com
Propagation may take up to 72-hours. But in my experience with Gandi and Namecheap, It only takes 2-3 hours, for full propagation.
Once complete, you can visit your server by typing your domain name. Just make sure that you named your Droplet the same as your domain name, plus the hostname (i.e. nc.chubbable.com)
Tools To Check DNS Propagation
You can use https://www.whatsmydns.net/ to check how your DNS config is doing.
Reference Image (NS Lookup):

NS Lookup Tool
Reference Image (A Record Lookup):

A Record Lookup Tool using WhatsMyDNS
Step 2: Setup LAMP Server
Now we created a new Ubuntu 18.04 VPS, next is to setup the Web Server using Apache, MySQL and PHP. Don’t get intimidated by this, since the setup woulld be easy and semi-automated. Sort of.
So let’s get started.
Login to your Ubuntu Droplet via SSH:
ssh [email protected]
Once logged in as root, create a new user account which is going to be your primary user account.
Invoke command below:
adduser your-chosen-name
…then follow the prompt. Take note, you must enter yoiur password twice.
Once completed, make the newly created user account as a sudoer. To do that, simply add the user-account to the sudo group.
usermod -aG sudo your-user-account
Next, copy your SSH public key to your newly created user account’s home folder. For this, we need to copy the whole .ssh folder recursively. Why so? Because we need the authorized_keys file for the newly created account. It holds the SSH public key which is needed to access the server via SSH with the newly created user account.
Command would be (while logged in as root):
cp -r /root/.ssh/ /home/user-name-here/
Then:
chown -R your-user-name:your-user-name /home/user-name/.ssh/
In my case:
chown -R chubbable:chubbable /home/user-name/.ssh/
Set proper read/write permission:
chmod 700 /home/user-name/.ssh/
chmod 600 /home/user-name/.ssh/authorized_keys
In my case:
chmod 700 /home/chubbable/.ssh/
chmod 600 /home/chubbable/.ssh/authorized_keys
Once done, you should be able to login via SSH using the newly created user account. Next we need to disable root login and only allow your user account to access your server via SSH. We need to do this for security measure.
While still logged in as root, do the following:
nano -c /etc/ssh/sshd_config
Around line 32, look for PermitRootLogin yes and changed it to PermitRootLogin no
Save and exit:
ctrl + o
Make sure you save the file with the following file name, then hit Enter Key. ctrl + x to exit the editor:
File Name to Write: /etc/ssh/sshd_config
Now, restart SSH Server so the changes will take effect:
systemctl restart sshd
Next, let’s try the new setup. Exit SSH and log in again, but this time use your newly created SSH user name:
ssh [email protected]
At this point, you can no longer use root but the newly created user, to login to your server.
Why root over SSH is bad?
There are a lot of bots out there which try to log in to your computer over SSH. These bots work the following way.
They execute something like ssh root@$IP and then they try standard passwords like “root” or “password123”. They do this as long as they can, until they find the right password. On a world wide accessible server you can see a lot of log entries in your log files. I can go up to 20 per minute or more.
When the attackers have luck (or enough time), and find a password, they would have root access and that would mean you are in trouble.
Step 3: Configure MySQL for Basic Security
On this step, we’ll configure MySQL for production use. You need to log in to your server using the user-name to made previously. All commands from now henceforth should be prepended with sudo.
Command:
sudo mysql_secure_installation
This will take you through a series of prompts where you can make some changes to your MySQL installation’s security options.
The first prompt will ask whether you’d like to set up the Validate Password Plugin, which can be used to test the strength of your MySQL password. Regardless of your choice, the next prompt will be to set a password for the MySQL root user. Enter and then confirm a secure password of your choice.
From there, you can press Y and then ENTER to accept the defaults for all the subsequent questions. This will remove some anonymous users and the test database, disable remote root logins, and load these new rules so that MySQL can implement the changes.
Step 4: Setup Apache Virtual Host for Nextcloud
Create the following directory structure, if you don’t have it yet.
/var/www/nc.chubbable.com/public_html
/var/www/nc.chubbable.com/logs
/var/www/nc.chubbable.com/data
Where:
public_html– will hold the NC files.logs– will hold the log files.data– will hold user-data.
To create those directories in one command:
mkdir -p /var/www/nc.chubbable.com/{public_html,logs,data}
Then create access.log and error.log files:
touch /var/www/nc.chubbable.com/{access,error}.log
We now need to create a .conf file for Apache Virtual Host.
Change directory to Apache’s sites-available directory:
cd /etc/apache2/sites-available
Create a .conf file for your domain (change nc.chubbable.com to your domain):
sudo nano nc.chubbable.com.conf
…and copy/paste the following (change nc.chubbable.com to your domain):
<VirtualHost *:80>
    ServerName nc.chubbable.com

    ServerAdmin webmaster@localhost
    DocumentRoot /var/www/nc.chubbable.com/public_html

    ErrorLog /var/www/nc.chubbable.com/logs/error.log
    CustomLog /var/www/nc.chubbable.com/logs/access.log combined

<Directory /var/www/nc.chubbable.com/public_html>
    Options FollowSymLinks
    AllowOverride All
    Require all granted
    Satisfy Any
</Directory>

<IfModule mod_dav.c>
Dav off
</IfModule>

SetEnv HOME /var/www/nc.chubbable.com/public_html
SetEnv HTTP_HOME /var/www/nc.chubbable.com/public_html
Save the file and exit:
ctrl + o
…then hit ENTER key. Type ctrl + x to exit.
Next, while still in sites-available directory, Enable your newly created virtualhost and disable the default one. Invoke these commands in succession.
sudo a2ensite nc.chubbable.com.conf
sudo a2dissite 000-default.conf
sudo systemctl restart apache2
At this point, you can test your domain to confirm it’s working. Launch a browser and visit your IP address or domain name, if you see a 404-error, then that’s fine. That a good indication your virtualhost is working. The reason for the error is because we disabled indexing in our virtualhost config and our web root is empty at this point.
Step 5: Install Required Softwares/Dependencies
While php7.2 comes with Ubuntu 18.04, PHP-mcrypt which is needed by NC, has been removed in php 7.2 – so we need to manually install it on our server.
Installing mcrypt in Ubuntu 18.04 php7.2
To install mcrypt in php7.2, first install the requisites:
sudo apt-get install php-dev libmcrypt-dev gcc make autoconf libc-dev pkg-config
Then install mcrypt:
sudo pecl install mcrypt-1.0.1
Just press enter key, when it reached the point where libmcrypt prefix is being asked.
Enable extension for apache:
echo "extension=mcrypt.so" | sudo tee -a /etc/php/7.2/apache2/conf.d/mcrypt.ini
Restart apache:
sudo systemctl restart apache2
Install dependencies and enable modules
Install NC dependencies, you can copy/paste;
sudo apt install -y php7.2-gd php7.2-json php7.2-mysql php7.2-curl php7.2-mbstring php7.2-intl php7.2-imagick php7.2-xml php7.2-zip php7.2-curl php7.2-dom php7.2-ctype php7.2-iconv php7.2-json php7.2-bz2
Enable modules needed by NC:
sudo a2enmod rewrite expires headers env dir mime ssl
And that’s it with Phase 1, you can now proceed to the actual Nextcloud Setup Guide below.
Phase 2: Step-by-step Procedure
On this phase of the guide, you will learn how to install Nextcloud on Ubuntu 18.04 Server (Bionic Beaver).
We’ll be using the latest version of NC, which is 13.0.4, as of July 3, 2018.
Step 1: Download and extract Nextcloud Installation Files
Login to your VPS via SSH and keep it open.
Launch your favorite browser and go to Nextcloud download page and click on the Download button, then right-click on the big blue Download Nextcloud button from the pop-up and copy the link address. You’ll need that when you download the Nextcloud file to your server. See reference image below.
Reference Image 1:

Downloading Nextcloud Installer File
Reference Image 2:

Download Link for Nextcloud Server Installer
Go back to your commandprompt and paste in your copied download link along with wget command.
So the command you’d type in is:
wget https://download.nextcloud.com/server/releases/nextcloud-13.0.4.zip
NOTE:
At the time of writing, the latest version is
Nextcloud 13.0.4.And the download link which was copied from the button is:
https://download.nextcloud.com/server/releases/nextcloud-13.0.4.zip
Next, extract the download file using unzip command. Yes, we use this command to extract downloaded Nextcloud installer file which is in .zip format.
Extract the installer by invoking the following command ():
unzip nextcloud-x.x.x.zip
Or in this case:
unzip nextcloud-13.0.4.zip
A directory named nextcloud should be extracted from the zip file. To check the files, do a ls -la nextcloud command. All files including hidden files (.htaccess) should be listed.
Step 2: Copy Nextcloud Files to Your Chosen Web Root
Make sure you already created the needed directories before proceeding to this step. In my case I chose to use public_html as my web root and this is how I structured it, see below.
/var/www/nc.chubbable.com/public_html
/var/www/nc.chubbable.com/logs
Where public_html will hold the Nextcloud files, while logs will hold Apache error and access log files.
Let’s proceed.
Go back to your command-prompt and type in cd to make sure you’re on your home directory.
Then copy all the files and directories inside nextcloud using the Linux copy command. See below command.
cp -ra nextcloud/. /var/www/nc.chubbable.com/public_html/.
The command should copy all files/folders inside the nextcloud folder and puts them inside of public_html.
For the sake of following through, I highly recommend that you use similar directory structure like I did in this tutorial. So you may just change nc.chubbable.com to your own domain or sub-domain.
Step 3: Apply Necessary File and Folder Permission to Your Web Root
Okay so we’ve copied all the installer files and it’s now time to set the necessary and proper permission for the nextcloud web root.
The goal here is to set apache user/group to own the files/folder and then set the needed read/write permission.
To do just that, do the following:
public_htmldirectory and files within it should be owned by Apache user and group, so invoke the following command:chown -R www-data:www-data /var/www/nc.chubbable.com/public_htmlSet read/write permission for
public_htmlfolder.chmod 755 /var/www/nc.chubbable.com/public_htmlSet read/write permission for files and folders inside of
public_html.Go to your
public_htmlfolder:cd /var/www/nc.chubbable.com/public_htmlThen set proper permission for files and folders, you should invoke the two commands below:
For all folders recursively, type this and press enter
find . -type d -exec chmod 755 {} \;For all files recursively, type this and press enter
find . -type f -exec chmod 644 {} \;
Step 4: Create DATA Folder and Apply Proper File/Folder Permission
For very obvious reason, you need to put your user-data folder outside of your nextcloud web root – the public facing folder. You don’t want smart people peaking in to your files do you? So move the DATA folder outside of nextcloud installation folder and place it else where.
The best location to place your nextcloud data folder is anywhere outside your web root folder.
For me, the best place and easiest would be the /var/www directory. In this guide, I’m going to place the data folder under /var/www/nc.chubbable.com directory in Ubuntu Linux.
NOTE: In this Nextcloud Guide my web root diretory is under
/var/www/nc.chubbable.com/public_html
Okay, now we get to the actual step of creating the data folder. Follow steps below.
While still logged in to your server, go back to your command prompt and type in:
mkdir /var/www/nc.yourdomain.tld/dataIn my case:
mkdir /var/www/nc.chubbable.com/dataNext, set files and folder permission. The data folder should be owned by Apache user and group and that it should be writable the Apache user.
To do just that enter following command (change domain part to yours):
chown -R www-data:www-data /var/www/nc.chubbable.com/dataThen set read/write permission:
chmod 755 /var/www/nc.chubbable.com/dataAnd that’s it! Proceed to next step.
Step 5: Create Database for Nextcloud and a User For It
Using only the commandline, we will create a new database for Nextcloud and a database user.
First login as root to MySQL.
Do it like so:
mysql root -u root -pAfter hitting
enterkey a password prompt should appear. Enter the password you created under themysql_secure_installationstep. Take note that typing your password won’t be shown in screen.Create the database.
After successfully logging in, create a database called
nextcloudand same name for the database user.To do just that, do the following:
create database nextcloud;Hit enter key, then:
grant all on nextcloud.* to 'nextcloud'@'localhost' identified by 'yourpasswordhere';Hit enter key, then:
flush privileges;Hi entery key and quit MySQL:
quit
Step 6: Initiate Installation Wizard Using Your Favorite Browser
So now that we have taken care of the requisites of Nextcloud Installation, you can now launch your favorite browser and start the Nextcloud Installation Wizard.
Type in your Droplet’s IP address or your Nextcloud domain name and hit enter key. You should be taken to a page like below. See reference image below.
Reference Image:

Installation Wizard Page for Nextcloud
On the installation wizard screen, you should fill in your:
- Nextcloud Admin User Name and Password.
- DATA folder location.
- Database user name and password.
- Database name.
Once done, hit Finish Setup button to start the Nextcloud installation.
If everything goes well, you should be presented with a page like you see on the image below. If so, then congratulations! You’ve installed Nextcloud on your Ubuntu 18.04 Server.
Reference Image:
Nextcloud Successfully Installed!
As you see in this post, it’s not that difficiult to install. As long as you have the basic Linux skill and this guide, you can get through it.
So there you have it noobs! I Hope this tutorial answered your question – “How to Install and Configure Nextcloud on Ubuntu 18.04 Server“
Next, go through the post-install procedure.
Nextcloud Post-installation Setup
On this phase (post-installatin setup) of this tutorial, we should be dealing with caching setup for optimum NC performance, pretty urls and https. NC actually recommends going through these under Security & setup warnings page of NC Admin Dashboard (see reference image below) where it says…
It’s important for the security and performance of your instance that everything is configured correctly. To help you with that we are doing some automatic checks. Please see the Tips & Tricks section and the documentation for more information.
Reference Image:

Nextcloud Security & Setup Warnings
So on this part of the guide, we should tackle the following recommendations:
Your data directory and files are probably accessible from the Internet. The .htaccess file is not working. It is strongly recommended that you configure your web server so that the data directory is no longer accessible, or move the data directory outside the web server document root.
Accessing site insecurely via HTTP. You are strongly adviced to set up your server to require HTTPS instead, as described in the security tips. No memory cache has been configured. To enhance performance, please configure a memcache, if available. Further information can be found in the documentation.
The PHP OPcache is not properly configured. For better performance it is recommended to use the following settings in the php.ini:
NOTE: We don’t have to deal with recommendation No. 1 above since we’ve gone through it already under – Step 4: Create DATA Folder and Apply Proper File/Folder Permission.
Setting Up PrettyURLs on Nextcloud
PrettyURLs gets rid of the index.php part of all NC URLs to make the URl clean and neat. It should be very useful in sharing file links.
For example:
http://nc.chubbable.com/s/Sv1b7krAUqmF8QQ
Instead of:
http://nc.chubbable.com/index.php/s/Sv1b7krAUqmF8QQ
Procedure
Here goes the actual steps to enable pretty url in Nextcloud 13.0.4
- Login to your NC server via SSH.
Edit
config.php.To edit, go to your NC
configdirectory:cd /var/www/nc.chubbable.com/public_html/configThen edit
config.phpsudo nano config.phpAdd below
overwrite.cli.url:'htaccess.RewriteBase' => '/',In my case, I got this:
'overwrite.cli.url' => 'http://nc.chubbable.com',
'htaccess.RewriteBase' => '/',
Then save the file:
ctrl + oReference Image:

Enabling Pretty URL
NOTE:
If you installed NC on a sub-directory of your domain, then you should do like so:
'overwrite.cli.url' => 'https://example.org/nextcloud',
'htaccess.RewriteBase' => '/nextcloud',
Finally run this occ-command to update your
.htaccessfile:sudo -u www-data php /path/to/nextcloud/webroot/occ maintenance:update:htaccessNote: Change the path to your own.
In my case:
sudo -u www-data php /var/www/nc.chubbable.com/public_html/occ maintenance:update:htaccessAfter that, changes are automatically applied to the
.htaccessfile.

Setup HTTPS
For this part, we’ll be using a free SSL for NC – it’s called Letsencrypt SSL.
To setup HTTPS on Nextcloud using Letsencrypt, do the steps below.
Procedure
- Login to your server via SSH
Go to Certbot website and download it.
URL:
https://certbot.eff.org/lets-encrypt/ubuntuother-apacheOn that page, dowload the certbot-auto script for use with Ubuntu 18.04. Just copy the code on that page.
This step is specifically for Ubuntu 18.04.
wget https://dl.eff.org/certbot-autothen set execute permission:
chmod a+x certbot-autocertbot-auto accepts the same flags as certbot; it installs all of its own dependencies and updates the client code automatically.
Create the SSL certificate and setup HTTPS.
In my case:
./certbot-auto --apache --agree-tos --rsa-key-size 4096 --email [email protected] --redirect -d nc.chubbable.comTo explain the switches a bit:
--apache– tells the script what web server you use--redirect– tell the script to setup a permanent redirect fromhttptohttps-d– tells the script to setup and create the SSL Certificate for the domainnc.chubbable.comemail– use to send notifications regarding your SSL status
Configure PHP OPcache in Nextcloud for Better Performance
Edit your php.ini file and enable these settings:
- opcache.enable=1
- opcache.enable_cli=1
- opcache.interned_strings_buffer=8
- opcache.max_accelerated_files=10000
- opcache.memory_consumption=128
- opcache.save_comments=1
- opcache.revalidate_freq=1
Procedure
Open your
php.inifile.sudo nano /etc/php/7.2/apache2/php.iniSearch for
[opcache]line in yourphp.inifile. Hitctrl + wto bring up the search field and type in[opcache]then hit enter key.Then below
[opcache], paste the following:opcache.enable=1 opcache.enable_cli=1 opcache.interned_strings_buffer=8 opcache.max_accelerated_files=10000 opcache.memory_consumption=128 opcache.save_comments=1 opcache.revalidate_freq=1Save the file:
ctrl + oRestart apache2:
sudo systemctl restart apache2Visit your NC Admin Dashboard and go to
Settings>Basic.OPcache warning should no longer appear.
Configure Memory Caching in Nextcloud
For enhanced performance, NC recommends configuring a memory cache. So in this guide, I’m gonna be using APCu for initial caching, while Redis to manage file locking and distributed caching.
You can opt NOT to do these on your NC instance.
But if you intend to use NC on a busy and multi-user environment, where files and folders are expected to increase faster than you thought of, then you should configure caching.
Procedure: APCu Installation on Ubuntu 18.04
Install APCu in Ubuntu 18.04
sudo apt install php7.2-apcu -yAdd in config.php:
'memcache.local' => '\OC\Memcache\APCu',In my case, I added the line below:
'htaccess.RewriteBase' => '/',
Procedure: Redis Installation on Ubuntu 18.04
Install Redis:
sudo apt install -y redisTo check if installed successfully:
redis-server -vSample output:
Redis server v=4.0.9 sha=00000000:0 malloc=jemalloc-3.6.0 bits=64 build=1bc80a08306a3efdOutput above states that Redis was installed.
Furthermore, confirm that Redis server is up and running as expected by checking for its listening socket on port number
6379:ps aux | grep redisSample Output:
redis 1501 0.0 0.3 51660 3732 ? Ssl 15:36 0:00 /usr/bin/redis-server 127.0.0.1:6379And based on the output, it is running.
Configure Redis to start on boot:
The Redis server should start after reboot. When not, NC will throw an error, provided that you’ve already added the configs to
config.phpMake sure Redis start after reboot:
sudo systemctl enable redis-serverConfigure Redis to use unix-socket instead of the default TCP socks. Unix sockets can get you some extra performance boost. I’m talking about microsecond benefits here. But still worth doing it, especially on a busy and multi-user deplyment.
Edit
/etc/redis/redis.confsudo nano -c /etc/redis/redis.confAround line 92, change
port 6379toport 0Around line 110, uncomment (remove
#sign):unixsocket /var/run/redis/redis-server.sock unixsocketperm 700Then change
unixsocketperm 700tounixsocketperm 770Save and quit:
Add the Apache user
www-datato the redis group:sudo usermod -aG redis www-dataAt this point, you’ve already installed and configured Redis server on Ubuntu 18.04. Next step will be to add the configs to NC‘s
config.phpfile.Proceed to the next step below to do just that.
Add configuration to NC
config.phpfile.With Redis configured, we can now add the caching configuration to the NC config file:
sudo nano /var/www/nc.chubbable.com/public_html/config/config.phpThen copy/paste these block of texts, below the APCu line we added awhile back.:
'memcache.locking' => '\\OC\\Memcache\\Redis',
'filelocking.enabled' => 'true',
'redis' =>
  array (
  'host' => '/var/run/redis/redis-server.sock',
  'port' => 0,
  'timeout' => 0.0,
  ),
Save the file and exit.
Reference Image:

APCu and Redis Configuration for Nextcloud
Reboot your NC server.
After rebooting, login to your NC admin dashboard and check on the
Security & setup warningspage.Go to
Settings>Basic Settingsmenu from the left pane.Warnings should have been cleared and says
All checks passed

File Syc Client
Now that you have installed and configured NC, you can now start adding your files. But before you can do that, you need to first install the NC Sync Client App. It’s like a Google Drive or Dropbox Sync App.
Go to:
https://nextcloud.com/install/
..and download the Desktop for your chosen OS or Mobile Client.
Reference Images:
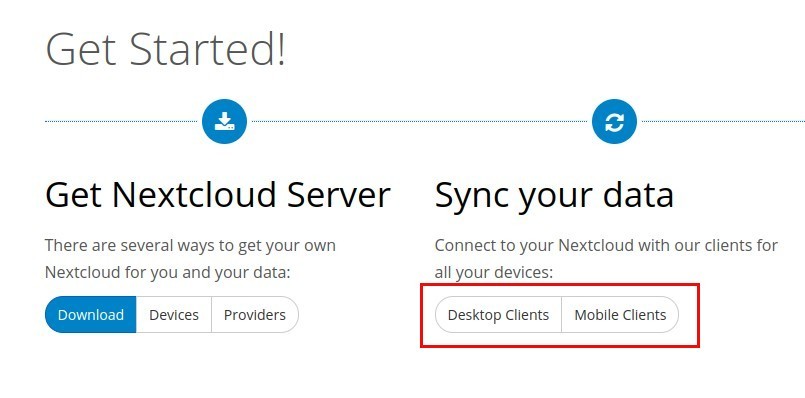
Nextcloud File Sync App

Nextcloud Desktop Sync Client App

Nextcloud Nextcloud Mobile File Sync App
It’s a Wrap!
So there you have it folks!
If you encounter issues while following this guide, please don’t hesitate to post your comments below. I will try my best to answer them when I have the time.
If it worked for you, then post a comment as well, and say “thank you, it worked!”.
Building your own cloud storage server is not that hard as you thought. All you need is a step-by-step guide written by newbie for newbies. However, you definitely need some Linux skills especially if you want customize the system, or there would be a need for extra-special deployment or troubleshooting needs. There will be no one-size-fits-all tutorial for that.