Last week (August 2016), I’ve upgraded my Linuxmint Machine from version 17 to version 18, which is called “Linux Mint 18 – Sarah”. Alongside with this, I’ve also upgraded my pfSense box to version 2.3.2. This after, I can no longer import my OpenVPN connection settings, with the error “Cannot import VPN Connection”.
This solution works for both Ubuntu and Linuxmint.
In my case, the exact error says like this…
Cannot import VPN Connection
The file pfsense-udp-1194-linuxmint.ovpn could not be read or does not contain recognized VPN connection information.
Error: the plugin does not support import capability.
Please take note, that I’ve used the Cinnamon Edition of LM18, which was release on June 2016. This version is based on Ubuntu 16.04.1 LTS (Xenial Xerus) edition.
When the time I’m setting up my VPN connection again (using pfSense), Network Manager failed to import my previous configuration. Take note, that my configuration is known to work with pfSense before, using Linuxmint 17. No issues or what so ever. I’ve imported the config files using Linuxmint’s network manager without a problem.
You might want to read my guide on How To Setup OpenVPN From pfSense’s Web-GUI.
After the said upgrades, I can no longer import the previously working configs using the network manager on Linuxmint 18, with the following error.
Reference Image: “Cannot import VPN Connection” error.
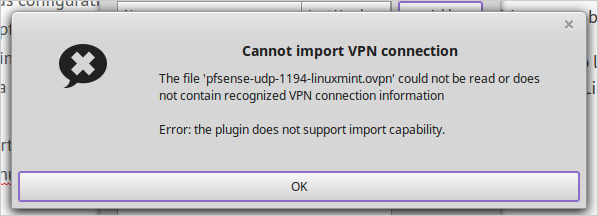
Reference Image – Can’t Import OpenVPN Configuration
So I did some troubleshooting, and tried using a different OpenVPN configuration file. This time, I’ve used a Linux distro called “ClearOS“. It’s a great server distro for both homes and small offices, that can do many things like act as an OpenVPN server.
I did the setup on a Virtualbox Guest machine, and downloaded the OpenVPN config files. Then imported the configs using network manager, and voila! My configuration was imported successfully.
I started to think what could be the problem, is it Linuxmint or pfsense?
And so I did some trial and error stuffs, and also did some research. Long story short, Network Manager app has gone buggy again according to what I’ve read. Sometimes it work, sometimes it doesn’t. It works for some files, and doesn’t for others, like in my case, it does not work on my file (pfSense OpenVPN config files).
Then after a few hours of research, trial&errors, I decided not to use the Import Function, and instead, manually create the OpenVPN connection. And this time, it actually worked!
If you have similar case as I’ve had, then follow through and get around that “Cannot import VPN Connection” error.
Steps I Did
Below are the steps I took to get around with the error. Take note that my machine runs on Linuxmint 18 Cinnamon Edition, while my pfSense is on version 2.3.2.
Step 1: pfSense OpenVPN Client Export Settings
These you can find on
https://pfsense.ip.address/vpn_openvpn_export.php…under Client Export menu
Verify Server CN – Set to:
Automatic – Use verify-x509-name (OpenVPN 2.3+) where possible
Block Outside DNS – Checked
Use Random Local Port – Checked
Step 2: Download & extract the configuration file for your specific user. This time, don’t use
Archive, chooseViscosity Bundleinstead, under “Viscosity (Mac OS X and Windows)”.Reference Image:

Reference Image – OpenVPN Config File
Step 3: Left-click on the Network Manager icon (from system tray), and left-click on
Network Connections. A new box should open.Step 4: Click on the
Addbutton, and chooseOpenVPNfrom the drop-down option. Then clickCreatebutton. A new box should open.Reference Image:

Reference Image – Network Manager Connection Window
Step 5: Enter & fill up the necessary fields.
Connection Name
pfSense-VPN– for exampleGateway
pfsense.ip.address:openvpn_port– see example below:192.168.1.1:1194Under Authentication > Type, choose
Password with Certificates (TLS).User Certificate
Click on the field and browse to
cert.crtfile.CA Certificate
Click on the field and browse to
ca.crtfile.Private Key
Click on the field and browse to
key.keyfile.Fill up
User NameandPassword. This should be your username & password under your pfSense account.Private Key Passwordis the one you configured under…Certificate Export Options > Password Protect Certificate.
Step 6: Click on Advance button and configure the following.
Reference Image:

Reference Image – Linuxmint OpenVPN Connection Window – Advance Tab
- Tick
Use LZO data compression. - Tick
Set Virtual Device Type: TUN
Then click
SecurityTab.- Tick
Step 7: Under Security tab, set Cipher & HMAC Authenticaiton. To know about this config, open
config.conffile (file downloaded from pfSense) and look for the value set forcipherandauth.ciphervalue goes to Cipher,authvalue goes to HMAC Authenticaiton.Then click on
TLS Authenticationtab.Reference Image:

Reference Image – Network Manager Connection Window – Security Tab
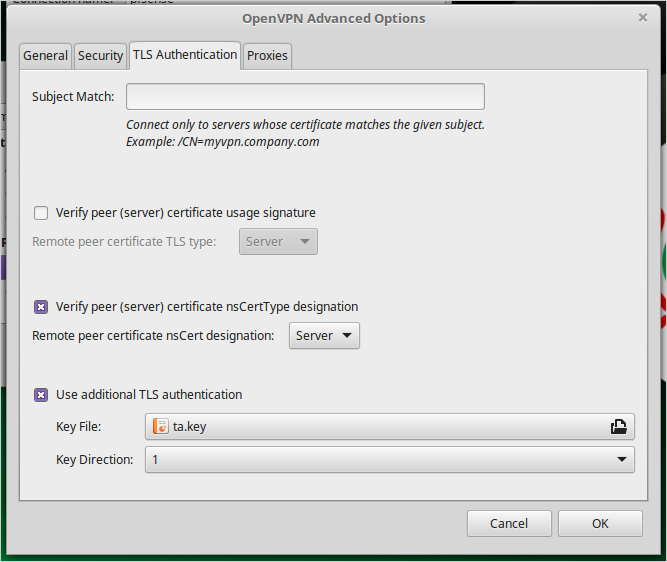
Step 8: Configure TLS Authentication.
Tick
Verify peer (server) certificate nsCertType designation, while settingRemote peer certificate nsCert designationto Server.Tick
Use additional TLS authentication. Then setKey Filevalue tota.key. Click on the field provided and browse for the file.Set
Key Directionto1. Click on OK button, then finally Save.
Reference Image:

Reference Image – Linuxmint OpenVPN Connection Window – TLS Authentication Tab
Step 8: Connect!
On your Linuxmint machine, click on the Network Manager icon, then click your OpenVPN connection name (configured in step 5-1). You should should be able to connect successfully.
Watch this YouTube for reference.


It’s a Wrap!
With this How-To, hope you got around that Cannot import VPN Connection issue and had created your VPN connection. In case it didn’t worked out, feel free to shoot your question using the comment section below and ask for further help. I will do my best to answer them, when I have the time.