Are you looking for some ways on how you could change your NAT Type from Strict to Open NAT, on your PS4 or Xbox ? If so, then jump right in and read this tutorial on how you would exactly do that.
Jump Links:
- Procedures
- Types of NAT
- Port Numbers
- What is UPnP and how to enable it
- Port Forwarding with DD-WRT Router
- Static DHCP Lease for DD-WRT Router
- Port Forwarding with Aztech DSL5001EN
- Static DHCP Lease with Aztech DSL5001EN
I am writing this guide in response to a request posted on my YouTube channel comments and Disqus comments.
One my readers asked me this:
Hello Mr.Chubbable – I need help to connect my PS4 with the Aztech 5018EN to get a NAT type 2 or 1. It is currently getting NAT type 3 which is a restricted and giving me a hard time playing online. Can you help on this? Thanks in advance
…and from my YouTube channel, someone posted a comment:
Pls post a video on how to change nat type.
When I first read those comments, I scratched my head and asked myself… Duh what? What the heck is NAT Type?
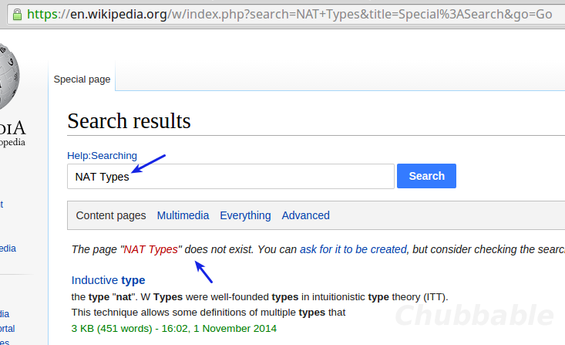
Honestly, at that time I don’t know what NAT Type is, though I know what NAT in Computer Networking is. So I did a quick research on Wikipedia, but got disappointed because no page exist yet that contains the term.
So I wonder why the term does not exist yet on Wikipedia or why it is not yet written about, probably it’s not really a technical term for Networking. Need to research on this topic later, in the mean time I’ll tell you about what you actually need to ask for.
So I did some more digging and found out that the term NAT Type is very well-known in the console gaming world. So if you’re a hardcore console gamer (Xbox or PlayStation) but sorta noob on networking, then you’d better read this post to understand what you’re asking about and what you should be looking for.
Okay, it’s like this…
PlayStation and Xbox categorize your Network Connection state to various types, they called it NAT types. I haven’t seen a console GUI ever before (not shy about that), but the NAT Types they’re mentioning about can be found on the console’s networking settings, then Test Connection or any term or label that says the same.
I don’t have Consoles, but I play games on PC and I forward a lot of different ports on my router to optimize my online gaming experience.
Now, depending on how your router or modem is configured, your console will show what NAT Types you’re currently at.
Xbox and PlayStation categorize NAT Types like so:
- Type 1 (Open NAT)
- Type 2 (Moderate NAT)
- Type 3 (Strict NAt)
To explain that further, read below.
What are NAT Types
Here’s how PlayStation and Xbox describes NAT Types.
Type 1 NAT or Open NAT – With this type of NAT, the console is directly connected to the Internet.
You connection enables you to chat with other players, join and host a multi-player or cooperative game with other players on the network. Overall, you will not have any issues with your connection.
You could also use a router with this type of NAT and make it appear as though the console is directly connected to the Internet.
To do that you could either:
Connected to your modem via bridged-mode or PPoE and Firewall is disabled. Only applicable with DSL Internet connections.
Enable DMZ in your router to direct inward traffic to your console’s IP address. This is not recommended for several security reasons.
Now this NAT Type or routing setup is not secure since all your network ports are exposed to the Internet. Imagine what a would be hacker could do if your system is totally exposed to the Internet.
Firewall is disabled on your Modem/Router, setting all ports in open state.
Basically, this NAT Type is what you should be getting for your gaming Console.
Type 2 NAT or Moderate NAT – You have a Type 2 NAT if your console (Sony PS4 Console or Microsoft Xbox Console) is connected to a Router to access the Internet.
Usually you use this kind of setup to share your Internet connection with other users or devices within your Local Area Network or Home Network.
With this type of NAT you should be able to chat, play cooperative or multiplayer games with other user on the PS4 or Xbox network. However, you may also encounter some voice chat audio issues with other players. To fix the issue with this NAT type, read further below and learn how to solve this.
Type 3 or Strict NAT – With this type, your system is connected to the Internet via a Router, and Firewall may be enabled or disabled on it.
A strict NAT Type enables your Xbox to ONLY play cooperative or multiplayer games and chat with other users on the Xbox network, however, you could only chat and play with users who have an Open NAT Type or Type 1 NAT. You can’t be chosen to host a game match if you’re into this kind of NAT.
In the case of Sony PS4 Console, communication with other PS4™ systems might have issues, or some of the System’s Network Features might not all work. However, you may be able to connect to the PSN (PlayStation Network) and perform downloads or updates.
You should know by now the different types of NAT on your PS4 or Xbox Consoles. Also, you probably know by now if what would be the best NAT Type to use with your Console.
…and that would be Type 1 or Open NAT.
Yes! That would be the best and optimal NAT Type to use with your Consoles, provided that we do the necessary security measures and other related task to make your console or system open to the Xbox or PS network.
Now that you know, I’ll teach you how you could change your Console’s NAT Type to Open or Moderate.
Continue reading.
Changing NAT Types
Before your read further, I need you to know that… when you ask about changing your NAT Type, you are actually asking how you do Port Forwarding or Packet Forwarding.
So if you want to learn how you would modify your NAT Type on your Xbox or PlayStation, you actually need to learn Port or Packet Forwarding.
You do this not on your Console, but on your Modem or Router. So when you say “Change NAT Type“, you actually need to tinker with your Modem or Router and not with your Console’s configs.
So essentially, you should be asking… how to port forward to get an Open or Type 1 NAT.
But you don’t always have to do this just to have an Open NAT status.
Yeah that’s right! You don’t have to forward ports to your PS4 or Xbox, if your Router has UPnP feature.
You might ask again… How To Get an Open NAT Type on PS4 or Xbox without Port Forwarding?
Simple answer is, enable Universal Plug n Play (UPnP) on your Router if it has it.
What the heck is UPnP
UPnP or Universal Plug N Play feature on a Router let’s your device seamlessly connect to your network without any further configuration. It opens the necessary ports for you and closes it when no longer used.
So this would be very helpful feature especially when you have several Consoles within your LAN or Home Network, accessing the Internet all at the same time.
That being said, UPnP would not always work especially with crappy Router brands and hardwares. But Linux-based and BSD-based software Routers is best for serving UPnP functionalities. If you want to try one of these Software Routers, then learn how to install PFSense or try flashing your Router with DD-WRT, OpenWRT or Tomato.
How to enable UPnP? Enabling this on a DD-WRT Router, you need to go to NAT / QoS Tab. Then UPnP > Tick Enable radio box for UPnP Service, then tick Enable for Clear port forwards on startup, and finally click Save button.
Reboot the router by going to Administration tab, then Management and Reboot router on the bottom of the page.
That’s it!
Reference Image: 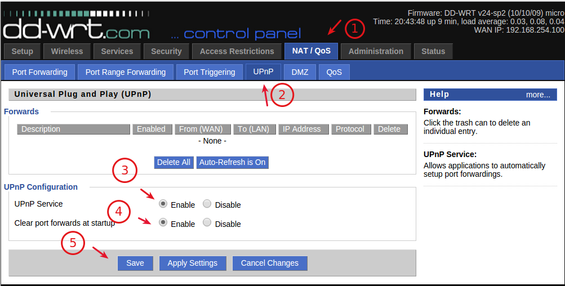 If all else fails, then port forwarding would be your best remedy to convert your NAT type into Open NAT Type.
You must take note however, that Port Forwarding only works with one device or single static IP.
Requirements
- Computer – You need this to configure your Router or Modem’s settings, and not your Console.
- Router or Router+Modem Combo
- Router/Modem Admin User Account
- DSL Modem in Bridged-Mode (N/A for Cable Modems or when not using a 3rd party Router.)
- Port Numbers Details for your Console
- Static IP Address set in your Console OR
- Static DHCP Lease
- Some of your Time
You need to know that these configs worked on my country (Philippines), using Globe Tattoo Broadband as my ISP, Aztech DSL5001EN as my Modem (with Router by disabled it), and Linksys WRT54G2 with DD-WRT Firmware as my Router.
So any port forwarding configs shown in this post shall be done using the above mentioned devices.
Before starting off with this guide, make sure that you already have a Modem set in bridged-mode, and that, it is fully working with your current home network setup.
Sony PS4 and Microsoft Xbox Port Details
Here are the necessary ports and protocols that needs forwarding to your Console.
Additional Info: For PlayStation, set Protocol for port range 3478-3480 and 6000-7000to BOTH. For Xbox, set Protocol for port 3074 to BOTH.
| TCP | UDP | |
|---|---|---|
| PS3 / PS4 Ports | 80 | |
| 443 | ||
| 983 | ||
| 3658 | ||
| 5223 | ||
| 9293 | 2053 | |
| 3478-3480 | 3478-34780 | |
| 6000-7000 | 6000-7000 | |
| 10050-10051 | 10070 | |
| 10070-10080 | 50000-60000 | |
| Xbox One / Xbox 360 Ports | 53 | 53 |
| 80 | 88 | |
| 3074 | 3074 | |
| 7500-17899 | 500 | |
| 30000-40399 | 1001 | |
| 1200 | ||
| 3544 | ||
| 4500 |
Procedures
Port forwarding is almost similar with all Routers on the market today. One difference is the term or label used on their router settings.
On some routers, Port Forward is labeled as Port Map.
You also need to know what protocols needs forwarding, which are, TCP and UDP. Also take note about Port Ranges, these are multiple ports that needs forwarding. Typically, you just need to fill up From field and To field of your Router’s port-forwarding page.
A dash - indicates a port range, like the ones listed above.
For this guide, I’m gonna be using my Linksys WRT54G2 Router, flashed with DD-WRT. Also used in this guide is my Aztech 5001EN CPE Modem issued by Globe Telecom Philippines.
You could use this guide with other Routers on the market, you just need to apply the basic idea of forwarding ports to a single node or IP address.
Note 1: Port forwarding is point-less when your ISP blocks several ports from their Firewall. And if your console is using DHCP assigned IP address or dynamic IP address. Also, you won’t be able to do some port forwarding if your ISP locks you out from your CPE (modem/router). This means that, you don’t have admin access to your Modem or Router. In addition to this, you also couldn’t even make any changes to your CPE. So in that case, you need to search for alternative ways on how you would access (w/ admin priviledge)your CPE.
Before you start with the guide, make sure you have the correct user account that has the administrative privileges for your Router. You won’t be able to modify setting on your Router if you don’t have this.
Step 1 – Assigned a Static IP Address to your Console.
There are two ways to assign a static IP address to your Xbox or PS4; 1.) Manually configure your network settings and assign a static IP address with the right subnet mask and gateway address.2.) Assign a Static DHCP Lease to your Console, you need to know your Console’s MAC address for this.
For me, it’s more easier to use and implement the Static DHCP Lease. So that’s what we’re going to do with this step.
With Static DHCP Lease, your Console should always have the same IP address, though you did not set it to have a static IP address on your console. IP address stays the same even after Console or Router reboot. You need to set this on your router and not on your Console.
You need to take note of your Console’s hostname or device name and MAC Address if you’re going to set a Static DHCP Lease.
To know your Xbox’s hostname, go to;
Settings>System>Network Settings>Available Networkthen…
Your-current-network>Configure Network>Additional Settings>Advance Settings>HostnameEnter your desired hostname or leave the one that’s in there. Take note of the name.
To know your Xbox’s MAC address, go to;
Settings>System>Network Settings> `Available Networkthen…
Your-current-network>Configure Network>Additional Settings>Advance Settings> …and you should see your MAC address here.To know your Sony PS4 Console’s MAC address, using your XBM (Cross Media Bar) menu, go to;
Settings>Network>View Connection Status>…then look for MAC Address.
To know or change your PS4 hostname or name, go to;
Settings>System Information>NameSo once you got your Console’s hostname and MAC address, go ahead and login to your Router and set parameters there.
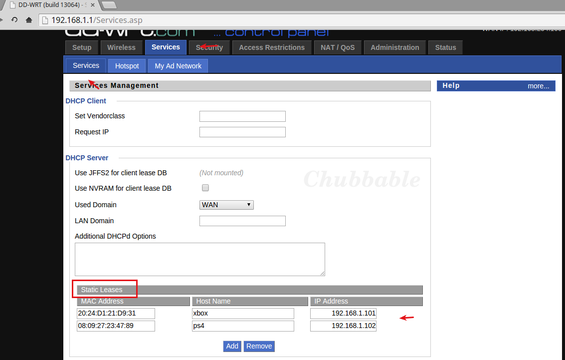
To set Static DHCP Lease for DD-WRT Router, go to;
Services>Services ManagementScroll down a bit until you see the
Static Leasesblock. Click onAddbutton to create a new set of fields for your entry. You need to fill upMAC Address,Host NameandIP Address.In my case, I filled up the fields like so;
- MAC Address –
20:24:D1:21:D9:31 - Host Name –
xbox - IP Address –
192.168.1.101
Reference Image:

After doing this, reboot your Router then your Console.
Check your network information or status and see if you’re getting the right IP address you set in the Router. If so, then continue with step 2.
- MAC Address –
Step 2 – Set port forwarding rules.
To forward ports to your Console, you should know the needed ports to forward. Consult with the Port Details posted above.
This step is very straight forward, you just need to fill things. So here we go.
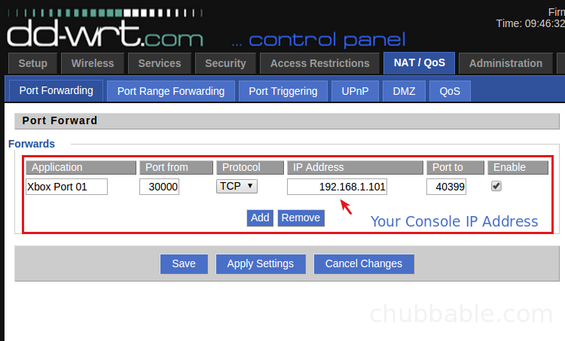
From your DD-WRT router, go to
NAT / QoStab thenPort Forwarding.Click
Addbutton to add a new set of fields.You need to fill the following fields:
- Application –
ex. Xbox Port 01 - Port from –
start port number - Port to –
end port number - Protocol –
either UDP, TCP or Both, see port details above - IP Address –
Your Console IP address - Enable –
Ticked or Checked
Reference Image:
- Application –
Step 3 – Forward the rest of the ports.
Repeat step 2 above and forward the other needed ports for your Xbox or PS4.
Note: A dash or hyphen (
-) indicates a port rangeStep 4 – Save all changes and reboot your Router.
Click on
Savebutton then go toAdministrationtab, scroll down to bottom and click onReboot Router.Reference Image:
Step 5 – Check your NAT Status.
If you get an Open NAT, then you did it! You’ve forwarded ports correctly.

NOTE 2: – There are some games that also needs port forwarding, so you need to know what ports are being used and create the necessary forwarding rules.
Aztech DSL5001EN Port Forward
If you have this Modem issued by Globe Broadband (a Philippine ISP), port forwarding with it is a bit different compared to my DD-WRT Router.
Below is a quick tutorial on how to port forward with Aztech DSL5001EN Modem+Router.
Procedure
First of, you need to know the Super Admin login info for your Modem. The known login details is given below.
User Name: admin User Pass: 3UJUh2VemEfUtesEchEC2d2e
Step 1 – Login to your modem.
Fire up your browser and go to
192.168.254.254.Login using the details mentioned above.
Step 2 – Navigate to Advance Mode.
Click on the Advance Mode Tab to access the advance configuration page.
Reference Image:
Step 3 – Navigate to Router Features.
Click on
Router Featuresbutton to access advance features and functions.Step 4 – Go to Port Forwarding page.
Click on the Port Forwarding tab to access the configuration page.
Step 5 – Fill up the necessary fields.
On this page, you need to fill up the following fields:
- Custom application name – Enter a unique name for each rule
- Public Port Range – Port numbers for your console
- Private Port Range – same with Public Port
- Local IP Address – IP Address set on your Console
- Protocol – TCP, UDP or Both
In my case, I filled up Custom application name with incrementing numbers. Like xbox 01, xbox 02, xbox 03 and so on. You must have already set a static IP address on your Console.
To fill the fields up, you need to click the
editbutton forRule 0and continue with the rest of the Rule numbers.Use the port numbers provided above for your Xbox or PS4.
I made a video for you to see how you would forward ports exactly on your Aztech 5001EN Modem/Router. Wanna see how you would do it? Watch – watch this video .
When done with the rules, reboot your Modem by going to
Admin>Rebootand click on theRebootbutton.After that, check your Console’s network status. You should be getting an Open NAT.

Getting a Static DHCP Lease
If you want to get a static IP address for your Console, without configuring your Console’s network settings, this method will work best for you.
To set this on your Aztech 5001EN modem, you need to know your Console’s MAC address. I’ve already mentioned how you could do this.
Let’s get started with this whenever you’re ready.
- Step 1 – Login to your modem.
- Step 2 – Go to Advance mode.
- Step 3 – Click on LAN
Step 4 – Then go to MAC/IP Address Reservation
You only need to fill two things; IP Address and MAC Address.
Just enter the IP address you want for your Console, take note that no other devices should be using that IP address.
Next, enter your Console’s MAC address. Click ADD button and reboot your router.
You should be now getting a static IP automatically even if your reboot your Router or Console.
Reference Image:

It’s a Wrap!
It’s that simple and easy to modify your NAT Type. All it takes is to configure your Router. So I hope this post answered your question and you learned from it.
So, to those who asked how to change NAT type from Strict NAT to Open NAT on PS4 or Xbox… port forwarding is what you actually needs (or UPnP).
But if your Router supports it, you must try UPnP first before resorting to Port Forwarding. Because with UPnP, you don’t have to configure anything, you just need to enable it from your Router. Plus, you could use multiple Consoles within your network to access and use your single Internet connection.
If you need further help, ask me about it from the comment section. And if this guide worked for you, why should you not post even just a short comment saying… it worked!.
Lastly, if you still couldn’t get an Open NAT status after making all the port forwarding rules, consult your Game support page and ask for additional needed ports to forward.