Here is another guide for Unicenta oPOS, that will teach how you would configure or set it up with a MySQL Database Server using Ubuntu 14.04. It’s a very easy to follow guide and all procedures are written step-by-step with reference images. So if you’re looking for such guide, then jump in to read the rest of the tutorial. You could use this guide for Windows or Linux based installation.
Jump Links
- Requirements
- Configure MySQL and Unicenta on the same machine – Windows based
- Configure MySQL on a separate machine – Ubuntu based
Update:
Unicenta 3.9 Installation Guide: Now available at http://chubbable.com/unicenta-3-9-ubuntu-16-install-guide
Purpose & Advantage
Unicenta’s default configuration when freshly installed is set to use the Derby Database Server. A database server embedded inside of Unicenta. This is only good for testing and experimental purposes. But when you’re ready to deploy your Unicenta box, you should be using it with an external Database Server like MySQL.
So the main purpose of this guide is to configure Unicenta with MySQL Database Server.
With this kind of setup, your Unicenta terminal should be able to access the database server whether it be online based server or locally deployed within your premises.
The advantages of this are; You have a separate database server where you store all your data and keep them safe in case your Unicenta box or terminal crashed or broke, you could also reinstall Unicenta for as many as you want while keeping your data safe and maintained from the database server, you could setup a multiple Unicenta terminal while maintaining a single database server which unify all your data and configurations and no need for a separate server for each terminal, you could also use a remote or online MySQL database server and connect any Unicenta terminal from different parts of the world and unify them using a single instance of database server, you as ADMIN could remotely login to Unicenta and check transaction logs, total sales and other managerial functions for a store or restaurant.
So for this guide, you’ll be taking advantage of those mentioned above after you successfully configured the MySQL database with Unicenta.
To following this guide, you must have the following.
Requirements
These are the things you need before starting off with this guide.
- An instance of Unicenta installation
- A separate machine/computer if you want a separate database server.
- USB Web Server software for Windows based database server (if you want to use. Windows)
- MySQL and LAMP Stack
- PuTTy if using Windows for configuration
- Some knowledge of Linux
- A lot of patience
Note: I’ll be using DB and DBS here to refer to Database and Database Server.
Installation Options
There are different options and setups to configure a Database Server with your POS System.
Some options are:
- Option 1 – DBS on the same machine where Unicenta is installed.
- Option 2 – DBS on another separate or dedicated machine.
Option 1: MySQL DBS and Unicenta on the same computer.
Before you start with the initial step, make sure that you already have a working Unicenta instance. If not, then you first need to install and configure Unicenta.
Windows Based
In this part of the guide, we’ll configure a MySQL DBS for a Windows-based Unicenta terminal.
Both Unicenta and MySQL are on the same Windows machine.
Procedures
Step 1 – Download, extract and run USBWebserver.
You know why I recommend this portable software? It’s because I’ve already tried and tested it and had used it several times for test purposes.
But if we’re talking about multiple nodes or terminals, we should use a dedicated machine for the DBS.
To continue, just download the software, extract it to a permanent directory of your choice. Say for instance, Drive D or any drive partition other than drive
C:.Step 2 – Run the software.
Since this software is a portable server, you don’t have to configure or install any additional software, just run it.
Click on the the
usbwebserver.exefile, the software should launch.Now choose your preferred language from the drop-down menu and click OK to continue.
You should see the dashboard now.
Reference Image: USBWebserver Dashboard.

USB Web Server Dashboard
Step 3 – Configure MySQL Port.
You may or may not configure this further. But with this software, MySQL is bound to listen to
port: 3307whereas MySQL’s default listening port is3306.If you want to change it back to the default port, then configure it from the dashboard.
Click on
Settingstab and then change port number under Port MySQL field.Click save button.
Step 4 – Create a database for Unicenta.
Launch PHPMyAdmin using the dashboard, you could click on the the button or directly access the page using your favorite browser (Firefox or Chrome).
To access the page using a browser, browse to:
http://localhost:8080/phpmyadmin/Reference Image:

PHPMyAdmin on Local Host
Then login using
rootas the username whileusbwfor the password. You should see a page similar to this image.Click on
Databasesmenu to create a new DB for Unicenta. Enter a DB name under theCreate databasefield, and then click on thecreatebutton. You should now have a DB for your POS. See reference image here.Now let’s create a new user for the DB. The easiest way to do this is to create a new user with the same name as the DB name.
Click on
Userfrom the top navigation menu, then click on theAdd usertext link. A new page should open, now fill-up the following fields like so.- User Name –
unicenta - Host –
localhost - Password –
your-password
NOTE: if you wanted to have a stronger password, use the
Generate passwordbutton to create a longer and difficult password. When you click on the button, it will automatically fill the password field, plus it will show you the generated password on a separate field. You should copy and save this password and keep it somewhere safe.Let’s continue, browse a further down and click/tick:
Create database with same name and grant all privilegesGrant all privileges on wildcard name
Then click
Check Alltext link for the Global Privileges to select all options under this. Finally, clickGobutton from the bottom-right of the page.And that’s it! You’ve created a Database for Unicenta. The next step would be to configure Unicenta to connect to the server.
- User Name –

Step 5 – Connect Unicenta to the DBS.
Go to the folder where Unicenta is installed, and then find and click the file
configure.bat.A configuration screen should pop-up like the one shown in this image.
Configure the settings like so;
- From the Database dropdown menu, choose
MySQL. - For the URL,
jdbc:mysql://localhost:3306/unicenta - For User,
unicenta - For Passwrd,
your-password
Now, click the Test button to test your connection. If all is well, then you should receive a You’re Connected! pop-up message. Reference image below.

MySQL Connection Success!
Click OK and then finally save the settings. You’re now ready to launch and connect Unicenta to your database.
- From the Database dropdown menu, choose
Step 6 – Fire up Unicenta.
Click on your shortcut to open Unicenta, a pop-up notice saying…
A working database cannot be detected.
A default database will be created.

Do you want to continue?
This is not an error, but a notice. It’s just natural that your newly created DB has no tables yet. So you need to hit
Continueto create the tables.Once you clicked OK you should be redirected to your Unicenta screen. If you’ve gotten this far, then congratulations you did it!

Option 2: MySQL DBS on another dedicated machine.
This setup will require you to use another computer to host your MySQL Database Server.
For this guide, we’ll be using Ubuntu 14.04 Server Edition. And this would mean, no GUI or it’s a headless installation of Ubuntu.
So before starting off with this part of the guide, make sure you already prepared your Ubuntu server. If not, then follow the tutorial from this post. Navigate to “Part 1: Ubuntu Server 14.04 LTS Installation” section of the post.
Procedures
Step 1: SSH into your Ubuntu Server to control it.
If this is the first time you heard of SSH, it’s a Unix-based command-line tool that let’s you connect to another machine remotely and securely.
Don’t worry too much about this because I’ll walk you through it and will provide you an easy to follow procedure.
If you’re on Windows, download PuTTy (putty.exe) for your platform. Select from the Green Colored area of the page.
After launching it, enter the Host IP address of your Ubuntu Server on the
Hostname / IP Addressfield and then select port22. Reference image below.
PuTTy Screen On Windows
From the left-pane of putty.exe window, go to
Connection>Datamenu. Then fill-upAuto-login Usernamewith your Ubuntu Server username. It should be a user name that actually exist on your Ubuntu 14.04 Server.Click
Opento initiate the connection.Step 2: Install LAMP Stack and PHPMyAdmin.
After logging in remotely, enter the following command to your putty.exe windows. You could copy and paste the command. To paste it, click middle mouse button.
sudo apt-get update && sudo apt-get install lamp-server^ phpmyadminThis should take a little while, depending on your Internet speed.
During the process a new screen should pop-up asking you to nominate a
rootpassword for your MySQL instance. Just make it so, you have to enter your password twice to confirm match. Reference Image:
Installing MySQL
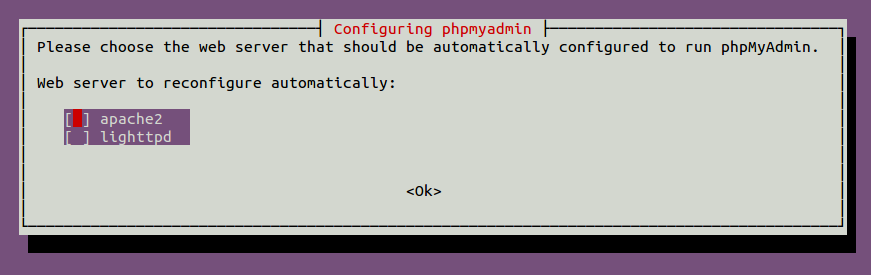
The install should continue, then it will ask you again to configure PHPMyAdmin to use which web server to use. In this case, you should use Apache2 and hit OK.
Reference Image:

Configuring PHPMyAdmin
Continue with the installation…
A new screen should ask you to Configure database for phpmyadmin with dbconfig-common? Select YES for this.
When a new screen will pop-up asking you to set a PHPMyAdmin password, do as it says and enter your. It will also ask for the MySQL application password, so you need to enter it twice.
Step 3: Install mcrypt and enable it.
Mcrypt is a PHP5 module, which is needed for this setup. So we should enable it with our setup.
To do just that, do the following command:
sudo updatedbThis command should update the locate database so you could locate certain files fast.
Then invoke the command
locate mcrypt.so. It should output the location of the extension. Copy the location and save it to a temporary text file. Then do the next command.locate mcrypt.iniTake note of the location again, you may copy the outputted text. Do the next command and paste the copied path.
sudo nano then-paste-the-copied-textSample input should look like this:
sudo nano /etc/php5/mods-available/mcrypt.iniThen edit the extension= line to make it like so:
extension=/usr/lib/php5/20121212/mcrypt.soSave the file by pressing
ctrl+o>ENTER.ois LETTER O. Exit the editor by pressingctrl+x.Step 4: Enable the mcrypt.so extension.
Command:
sudo php5enmod mcryptStep 5: Restart Apach2 Server.
sudo service apache2 resartStep 6: Fire up your favorite browser and access **PHPMyAdmin page.**
Sample:
192.168.1.123/phpmyadminYou should use your servers IP address here.
If you reach the Admin Login Page, then congratulations! You have now configured PHPMyAdmin. Next step that you should do is to configure MySQL to allow remote connections from within your LAN.
Step 7: Allow remote connection to MySQL Server.
By default, MySQL is configured to listen from localhost (127.0.0.1) connection only. So we need to reconfigure that one so It will listen from remote connection, like from another Unicenta terminal from within your local network.
To do just that, logon to your Ubuntu Server and enter the following command:
sudo nano /etc/mysql/my.cnfThen scroll further down ’til you see this section,
[mysqld].Then look for
bind-address = 127.0.0.1Change this into:
bind-address = your-server-ip-addressSample:
bind-address = 192.168.1.123Save the file and exit the editor. That’s
ctrl+oand thenenter, thenctrl+xto exit.Finally, restart MySQL by doing the following command,
sudo /etc/init.d/mysql restartStep 8: Create a database for Unicenta to use.
For the purpose of demonstration, We will
unicentafor database name,unicentafor database user-name andpasswordfor the DB password.Method 1 – Using PHPMyAdmin GUI.
Use web GUI to create a database. Follow Step 4 from Option 1.
Method 2 – Creating a new database using the command-line.
while still logged in to your server enter
mysql -u root -pand then hit enter key. Input your password and press enter key. When you input the password, it will not show on your screen.Upon successful login, you should get a prompt like this:
mysql>To create the database, type the following and press ENTER key:
create database test;You should get an output like:
Query OK, 1 row affected (0.00 sec)Create a username and password for Unicenta to use:
grant all on unicenta.* to 'unicenta'@'your-unicenta-ip-address' identified by 'password;And…
flush privileges;Finally exit MySQL, by typing
quit.NOTE: You must have configured your Unicenta terminal to have a static IP address instead of dynamic IP address through DHCP from your Router.
Step 9: Make a test connection.
Use your Unicenta terminal to test your DB connection. To do this, just repeat the previous steps mentioned Option 1, Step 5, then use the database details you’ve created in this step.
…and that’s it!


NOTE: You could also use this procedure on a Linux-based Unicenta installation, where you would want to setup the database server and Unicenta on the same machine. Just skip Step 7 from this part of the guide.
Step 10: Set basic firewall.
Though your MySQL server is just for offline use and not online, you still have to setup a basic firewall for it. Do this is not so difficult, so read on.
Login to your server again via SSH and do the following command:
sudo ufw enableThat should turn on Firewall blocking all ports. So you have to open the most important ports for you setup. Since this machine is just running MySQL server with Apache2 as a web server, you should only open ports
22,80, and3306.The command for this is:
sudo ufw allow from 192.168.1.0/24 to any port 22then…
sudo ufw allow from 192.168.1.0/24 to any port 80lastly…
sudo ufw allow from 192.168.1.0/24 to any port 3306NOE 192.168.1.0/24 is your existing LAN subnet. This means, you are allowing access to the specified ports from port IP range 192.168.1.1 to 192.168.1.255. So use your existing network config for this step.
It’s a Wrap
Employing this kind of configuration lets you take advantage of a centralized data storage for a multiple Point of Sale terminals using Unicenta oPOS. With this, you should be able to maintain a single database from a single server, instead of maintaining a multiple copies of database on an embedded database setup of Unicenta.
Embedded database is just for testing, but when you’re ready for deployment, a separate, dedicated and centralized database server is recommended for Unicenta.
So there you have it.
This is my step-by-step guide on how to configure Unicenta oPOS with a MySQL Database Server.
I hope you find it useful and helpful. Please feel free to post your comments. Saying thank you if it worked for you motivates me to write more guides.