Here is a simplified guide on configuring your DD-WRT flashed WiFi Routers to limit or prioritize bandwidth for specific IP address, MAC Address, Application or Interface. If you’re the boss of your home network and you share your Internet with family members and guests, then you should be doing this on your Router. So jump on in and read the full tutorial.
In order for you to follow the guide properly, you need a properly configured and working local home network. You also need to consider your Internet Speed plan for this and make sure that you have a full administration access to your ISP issued modem or network router.
You also need to set your modem in bridged-mode, if you’re on a xDSL connection, and set your DD-WRT router to have a WAN connection type of PPoE.
QoS, Bandwidth Prioritization, Traffic Shaping and Speed Limit
You most probably searching for these terms when searching for guides to either limit the speed of your shared WiFi, throttle down the speed of downloads, or you need to prioritize on your gaming bandwidth.
Bandwidth prioritization, traffic shaping, speed limiter, all falls under the Quality of Service.
So if you want to configure a Quality of Service (QoS) rules on your DD-WRT network router, you could accomplish that by either bandwidth prioritization or traffic shaping.
And that’s what we’re going to do with this guide, using your DD-WRT flashed network/WiFi routers.
Before you start of with this guide, you should know first that you could actually set a QoS rule to target several aspects of your home network. And these are;
Service or Application
Set priority rules based on service or application name. For example; VoIP, Skype, or a name of a Game like Dota 2.
Netmask
Set priority rules to target a Netmask. Your netmask setting is your IP address range. So if you set your netmask to 24-bit, ie
192.168.1.0/24, this would mean that your netmask covers IP addresses from192.168.1.0to192.168.1.254. So if your set QoS rules for Netmask with 24-bit, you are targeting a possible 254 hosts.MAC Address
This is a unique identifier issued to your network controller like Network Interface card or WiFi adapter. Setting a QoS rule to target this would mean a host or node specific rule.
Ethernet Port
Setting a Quality of Service rule for this would mean all devices, hosts or nodes connected to a specific Ethernet port shall be affected by the QoS rule.
Procedures
Here are the steps to configure your network router’s Quality of Service. You could actually implement QoS by targeting several aspects of your home network. You could set a rule to target a specific IP address, Netmask, Service, MAC address or by Ethernet port.
Step 1: Login to your DD-WRT flashed router as admin.

Quality of Service Page
The default IP address to reach your Network Router is
192.168.1.1.Step 2: Navigate to the QoS settings page and enable the service.
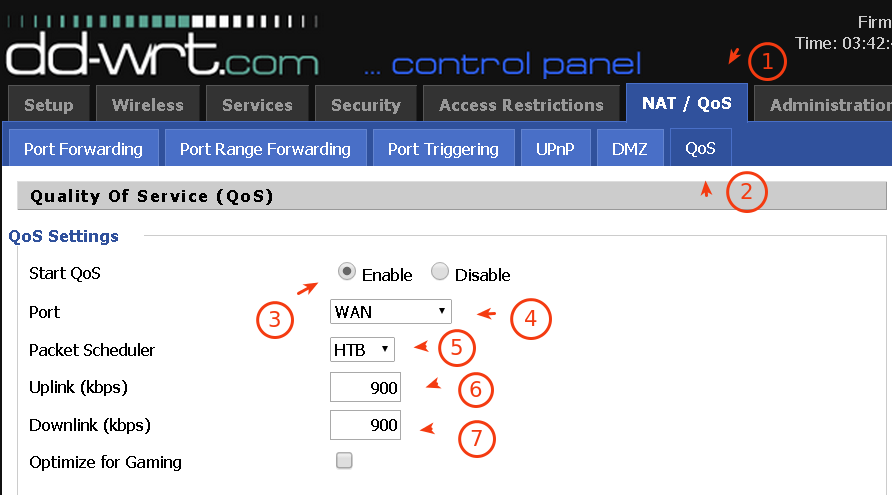
From the main menu click on NAT/QoS menu, then QoS just beside DMZ menu.
On the page, click Enable checkbox for Start QoS field.
For Port, should be WAN.
Packet scheduler, pick HBT. From the dropdown menu, you’ll also see HFSC. But for the purpose of demonstration, I will HBT with this guide. Besides, in my experience HBT seems to perform better.
For Uplink and Downlink, you should only enter 80% of your subscribed plan. Why? because not all the time, your ISP serves you their advertised bandwidth plans. So if you subscribed for a 1Mbps plan, you should only enter
800 Kbpsas your Downlink speed, as a contingency in case your ISP couldn’t serve their promised bandwidth speed for a certain period of time.Step 3: Choose how you prioritize bandwidth.
You could choose to set rules either for a specific service name, MAC address, IP Netmask, or Ethernet port. It’s up to you… you decide.
Also, with DD-WRT… you could prioritize and control bandwidth based on five pre-defined priority class names called; Maximum, Premium, Express, Standard, and Bulk.
To explain these further, read below.
Exempt
Any rules set to this priority class should not be affected.
Maximum
Any rules set to this priority class shall have maximum priority over others.
A minimum of 60% of total allocated throughput should be reserved for this priority class.
Premium
With this class, bandwidth priority is set to have a minimum of 25% of the total allocated bandwidth.
Express
A minimum of 10% of the total allocated bandwidth shall be set for this priority.
Standard
All services that are not set under any priority shall be automatically set under this class.
A minimum of 5% of total allocated bandwidth shall be give to this priority class.
Bulk
1% is allocated with this priority. If you’re into downloading, then you should set your apps to this priority class because with this class, if other users and application is using all available bandwidth while your downloader client is on… then this priority class will kick in and limit your download speed to a minimum of 1%.
And when there is enough bandwidth, and no other users or applications is using the bandwidth, then it should use all the available bandwidth.
Note 1: Bandwidth is allocated based on “minimum” percentages of your allocated download speed from QoS Settings you set under Step 2 above.
Note 2: Minimum means, the least possible bandwidth allocation if most of your bandwidth is used up.
To continue with this step, you need to choose which priority mode you would want to use. You could select either of the following:
Services Priority – Set priority rules based on service or application name. There are pre-configured services already selectable from the Service Name drop down menu. If you want to add your own, you need to know what ports or port range your service/application use.
For example, you want to prioritize and control bandwidth for Dota 2, it’s an online game right? So you need to know the port ranges used with this game and add it to a new service name. Here is a quick video demo for that.
Netmask Priority – I’ve already mentioned about this. If you want the rule to target all local IP addresses in your LAN then you should use this. For example, you’re using subnet
192.168.1.0, then you should enter192.168.1.0/24. Click Add button then set priority class.MAC Priority – Prioritize bandwidth based on your device MAC address, enter your target device MAC address here, then click add. Set priority class after. In case you’re not sure on how to get your device MAC address, then read this guide; “How To Know Your Device MAC Address“
Ethernet Port Priority – If you want to set QoS rules for specific ports on your Router, then use this mode. Just select priority class for your chosen port, your can leve Max Rate part untouched.
Don’t forget to click Apply Settings to save and commit your changes.
So those are the easy steps in configuring your DD-WRT flashed routers. One thing more that you should know about these configurations. You should also know about Precedence
Precedence or Order of Priority
In real-world applications, there are times that you make several rules that may conflict with each other. Some priority rules gets trumped by the others and other rules takes over the others. That’s because of Precedence or the order of priority in case of contradicting rules.
For instance, you have a computer that has an IP address of 192.168.10.101 and a MAC address of A1:B1:C1:D1:E1:F1. Then you set a rule like so;
Netmask Priority = 192.168.10.101/24 | Priority = Standard

MAC Priority = A1:B1:C1:D1:E1:F1 | Priority = Premium
Obviously, this would have a contradicting rules. Because you set a Netmask Priority rule that targets IP address 192.168.10.1 onwards up to 192.168.10.254. and it happens that your IP address is covered in this rule. Plus, you set another rule to target your device using it’s MAC Address. So in this scenario, you have set two priority rules that targets the same device or host. Now, the final rule that should take charge would be the MAC Priority rule.
Here’s how the order of precedence works. No. 1 has the highest precedence and should take over other rules, in case of conflicting rules.
- No. 1 – MAC Priority
- No. 2 – Netmask Priority
- No. 3 – Interface Priority
- No. 4 – Services Priority
- No. 5 – Ethernet Port Priority
How To check which QoS priority is taking over in my example case?
If you really want to check it, then you should use the command-line for this. If you’re on Windows, you could readily use telnet to invoke the command.
Login as root and use your webgui admin password. You should always use root username plus your admin password to successfully login using telnet.
So open up your command-prompt by going to Windows start menu > run > type in cmd and enter. A black screen should open, that’s the command-prompt.
Now enter telnet 192.168.1.1 or whatever IP address you configured with your DD-WRT Router.
Then type in; cat /proc/net/ip_conntrack and press enter key. Output text should be printed on your screen.
Now look for your device IP address, then along with it look for a mark= text. Take note of the value and compare the result with the following info.
- Mark=100 – means Maximum Priority is taking charge
- Mark=10 – means Premium Priority is taking charge
- Mark=20 – means Express Priority is taking charge
- Mark=30 – means Standard Priority is taking charge
- Mark=40 – means Bulk Priority is taking charge
Moving back to my example above, MAC Priority should take charge over the Netmask priority. Take note of the Mark Values above, and watch my video proof . I should be getting a mark=10 for Premium priority instead of Standard priority, which is set under Netmask priority.
Note: The MAC address used in the video is not my real MAC. It’s a temporary MAC address to be only used for the demo. But it should function as normal.
Sample Setup & Scenario
Here are some samples and real-world scenarios where you would want to setup QoS or control bandwidth on your DD-WRT-flashed Network Routers.
You want to prioritize your device to have the most priority within your local area network while the rest shall be given lower priority regardless of service or application being used.
Sample config:
Set your overall download and upload speed to 80% of your subscribed plan.
Put your device to MAC Priority and enter your device MAC Address. Then choose Premium for Priority.
Set the rest of the local devices to have a Netmask Priority by entering your Netmask under Netmask Priority block.
Apply changes and that’s it.
You want to prioritize your online gaming speed, while letting others use any available bandwidth with video streaming and basic web browsing.
Use Service Priority, add a configuration for your online game and fill up the service name and necessary port range. Add and save your changes.
Set priority to Express, yes… that would be enough for online gaming. Configure other hosts/nodes to Netmask priority and put a Standard priority.
If you have a Dedicated Downloader box, you may put it under MAC Priority and assign a Bulk priority to it.
It’s a Wrap
I hope you learned from this post and I wish that you followed and applied the guide with positive results. Feel free to experiment and create any priority combination, since there is no exact formula when it comes to this type of things.
The most important thing is, you know the basics and you understand most of the labels and functions found in your DD-WRT QoS settings page. So take note of priority classes (premium, standard, etc.), priority modes (MAC address, Netmask, etc.) and mark values.
Thank you for reading my guide on DD-WRT Quality of Service Configuration.
Also check out my guide on TP-Link TL-WR720N QoS Configuration, and don’t forget to post any comments below.