Newbie-friendly guide on how you would install Endless OS alongside Windows as a dual-boot, or as your primary desktop operating system. This tutorial should target the not-so-techy people and would let them understand the process quickly and easily.
So in this post, I will discuss how you can place the software into your system, from scratch, on a step-by-step basis. I will tell what things you need and need to know before starting off with this guide, so read on.
For those who landed here and just got curious about what this post all about, I like you to read some bits about this beautiful Linux Distro. I hope it won’t bore you.
Jump Links
- What is Endless OS
- Things you need
- 3 Ways to install Endless OS
- Installing it side-by-side with Windows
- USB Stick Installation
- Hard Drive Installation – as your primary OS
- Video Guide: Endless OS Installation – Side-by-side with Windows
What is Endless OS
Endless OS or Endless Operating System – is a Linux-based Operating System that was originally made to run on Endless Computers. The OS comes shipped with 100+ Apps and pre-loaded with useful contents like encyclopedia and lots of offline reference materials like; Travel, Cooking, Farming. It also includes Games and Productivity Apps like Spreadsheet & Word application, Photo & Video editor.
Like Ubuntu (the Desktop Version) or Linux Mint, Endless is also a Linux distro but with heavily modified GNOME desktop.
I mentioned Linux Mint here, since it’s my favorite distro and my primary OS.
Endless Computers are PCs marketed by Endless, a company founded in San Francisco, California by Matthew Dalio and Marcelo Sampaio. Endless Computer for the Hardware, while Endless OS for the software. It’s a PC-OS tandem similar (but not likely) to Mac and OSX.
It’s a hardware and software tandem, marketed by the company and being pushed to third-world countries as Linux-based PCs. It’s a computer with its own brand of operating system.
Endless OS is now offered free to download and use. You are also free to distribute the software contained on physical media such as CD/DVD, USB disk or SD/MMC card even for a minimal fee, provided that you let the team know by e-mailing [email protected].
The GUI or interface that you see on Endless OS is based on GNOME, which is a Unix desktop environment. Though this is heavily modified under Endless, and made the interface very sleek and pretty looking Linux Deskop.
That said, I think this should answer your question about what EOS is.
By the way, when I mention EOS on this post, I mean Endless OS.
Version Release
As the time of drafting this guide (November 10, 2016), the most recent version is version 3.0.6.
This version (or newer) supports applications from other app developers/publishers (not just from Endless Team) by using a new application bundling system called Flatpak (flatpak.org).
Endless OS Versions
The Endless OS Download is offered in two versions, which are the Basic and Full version.
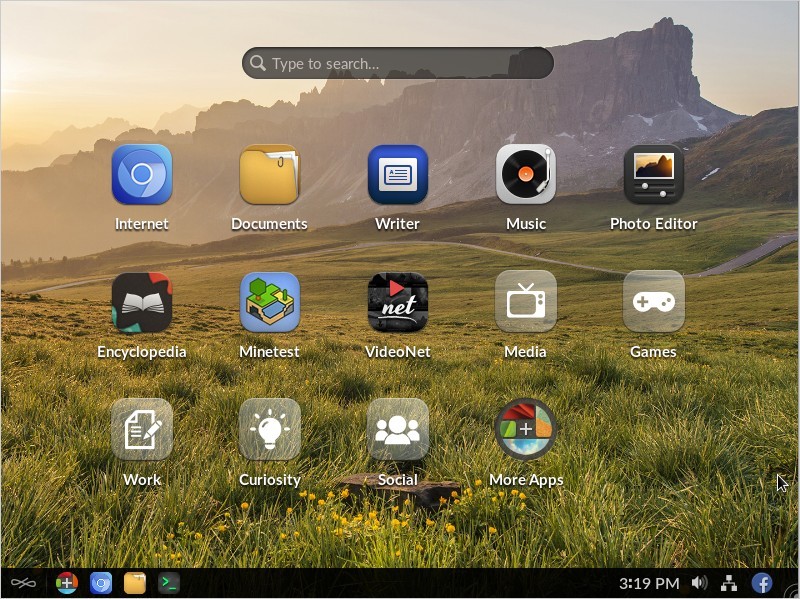
Full Version is a downloadable image file that takes around 20GB of storage space. This version comes pre-shipped with 100+ applications and that includes; Encyclopedia, Video/Audio Player, Photo/Video Editor, Sreadsheet/Word Application, Games, and 100 more applications.
Reference Image: Desktop Screenshot of the Full Version
Basic Version is the trimmed version. It comes with the basic stuffs like; Office Applications (Word, Spreadsheet, Presentation), Browser, DVD Writer and Multi-media Player. To quickly try and download EOS, use this version, then install any Application you would want after.
Reference Image: Desktop Screenshot of the Basic Version
Why I Created This Guide?
I’ve ran through issues while trying to make the USB Flash Drive installer.
I’ve dealt with this and went out of way to get around the issue. I’ve used third-party apps & FOSS to install EOS on my hard drive. And I decided to share the methods that worked for me by posting it here.
Overall, my primary reason for writing this guide, is to help newbies like myself. I’ve encountered issues while trying to make this OS work. And I wanted to share what worked for me that might work for you too and save time while trying to make Endless OS run on your system.
So I’ve written an easy to follow tutorial on Endless OS installation, using various methods for different scenarios.
Read further.
I stumbled upon this software on Facebook, it showed as Ads.
The ads showed up, probably because of the interest-based ad platform used on Facebook.
Since it’s my interest, I clicked the ads and landed on https://endlessm.com/.
After reading some of its features and explored some screenshots, I decided to try the OS and downloaded the Full Version of the image.
Once downloaded, I quickly explored the folders while expecting an Endless OS ISO file like most Linux-distro offers for download. But later discovered there’s no such file, instead I got a .xz compressed file.
I did a quick search on their website and found that you can install Endless OS alongside Windows.
Along with this info, I’ve also read that I could install the software on USB Drive, so I could try the OS without actually placing on your hard drive.
So to make long story, short. I tried the official method, by using Windows installer file (endless-installer.exe) to create the USB stick. In case you didn’t know yet, you can use this file to install EOS on a computer with Windows already on it. A dual-boot system.
Following the official method, had issues. At least in my case.
I’ve tried creating the USB stick by using the already downloaded Image.
The guide on EOS’s site, mentioned that the installer will download the Image of your choice (Basic or Full). See reference image below.
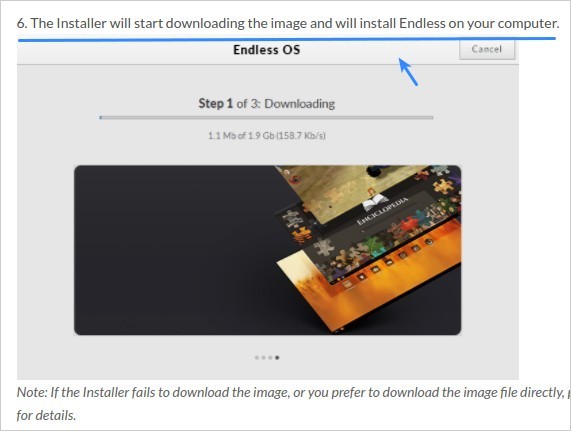
Screenshot of EOS post.
And I asked…
How to make the USB Installer without downloading the file again?
I’ve already downloaded the file by using the “Download from Linux or Mac OS” link. And if you use the endless-installer.exe file, the wizard will download the image file if it doesn’t find any. But why download the file again when you previously had downloaded it. In my case, I downloaded the Full Version, which took 14GB of my HDD space. So this would not make sense to run the wizard and download the image again.
So to workaround this issue, you should put endless-installer.exe file inside the folder where the necessary image files are located.
If you have already downloaded an .img.xz image file and the .asc signature, move them into the same folder as the Endless Installer (i.e., endless-installer.exe). If you have used your web browser to download all of these files, they will likely already be in the same Downloads folder and you will not need to move them.
When you run the Endless Installer that can be downloaded from https://endlessm.com, it will allow you to select the `.img.xz` you already have rather than making you download it again. This will allow you to install on Windows, create an Endless USB Stick using your existing image file. — Posted by Marco Mai
But that didn’t work in my case! At least for the EOS marked v3.0.3.
The installer file I’ve used was version 3.0.5.1 – and this did not work on eos-amd64-amd64-en-3.0.3-full.
In my experience, what worked was…
- Used version v3.0.5, from Endless OS Download page (Download from Linux or Mac tab)
- Download
endlessos-installer.exev3.0.5.1 - Copied
endless-installer.exeto3.0.5folder, where all the files are located.
The endlessos-installer.exe v3.0.5 did not worked on eos-amd64-amd64-en-3.0.3-full, but I have a workaround so we could install EOS on a USS Flash Drive or Hard Drive.
Issues Encountered With The USB Stick Installer
The App crashes on Step 2 of the 2nd-part of the wizard. This is the part where files are written to the stick. OS used was Windows 7 64-bit.
Reference Video: Endless Installer Crashes
So if you only have Windows and you ran through this issue, you won’t have the chance of trying Endless OS.
Though, you can get around this issue by using a third-party image writer software, free tool called Rufus – for Windows Systems.
When Endless Installer fails on your PC, use this method to clone the image to your USB drive. This way, you could still try EOS by running it from your Flash drive.
USB Stick doesn’t boot on BIOS-enabled PC.
I’ve successfully created a USB installer using an evaluation copy of Windows 10 32-bit.
But the thing is, it doesn’t boot my machine, which is based on Gigabyte EX58-UD3R motherboard. It hangs on the first boot up screen or during POST (Power On Self Test).
Tested it on another machine with Emaxx AMD780G Pro motherboard, and it booted without issues.
I did a quick search for remedies on EOS community forum, but to no avail (as of November 15, 2016).
What worked on my Gigabyte-based computer, is the one I made using Rufus Image writer. Though this USB won’t have the installer feature. I won’t be able to use it to format a hard drive and directly install on it. But I have a workaround for this, read further below.

USB Installer With Reformat Option

Installation Requirements
To create an instance of EOS you got to have the following. Others are optional.
- 32GB USB Flash Drive or SDCard (at least) – if using the full version download or at least…
- 8GB USB Flash Drive or SDCard – if using the basic version download
- Endless OS Image File (Basic or Full Version)
- Image Writer Software (Rufus, DD, Clonezilla)
- Plenty of spare time and coffee
- Some patience
Install Procedure
Before starting off, make sure you have downloaded the installer file and placed in a convenient location in your computer. You need to browse to this file later.
To have an overview of the procedure, read below.
Summary
- Get the Image from Endless OS Download page, then extract the file (Basic or Full)
Write the image on a USB stick or SDCard.
- Using
endless-installer.exe - Using Rufus Image Writer
- Using
Insert the newly created Endless USB or SDCard to your target computer.
- Set your target computer’s BIOS settings to boot from USB (for Bios enabled PCs) or enable EFI (for EFI capable Pcs).
- Watch your screen, EOS splash screen should appear. Wait for it until it reaches the login screen.
- Done! You should have reached the Desktop after entering your username and password.
Method 1: Install Endless OS on a USB Flash Drive or SD Card
If you want to test EOS without writing on your hard drive, use this method to install on a USB Flash Drive or SD Card.
You will then boot from these devices and run Endless OS from it. You should be able to test the features and explore the hundred apps pre-installed, if you opted for the Full Version.
Using Method 1 below, will let you create a bootable Endless USB stick and an installer, that you can use to format your hard drive.
Step 1: If you’re on Windows, download the
endless-installer.exefrom this page.Step 2: Write the image to a USB stick or SDCard.
With this method, the
endless-installer.exefile will be included in the USB stick and you can use it to install EOS alongside Windows.Once downloaded, run
endless-installer.exeto start the wizard.This step should prompt you to download the version you would want (Basic/Full).
Or do the following, if you had previously downloaded the image.
Copy/paste
endless-installer.exeto where the EOS files are located.Then run the installer.
It should detect the image version you have.
Reference Video: Endless USB Stick Using Previously Downloaded Files
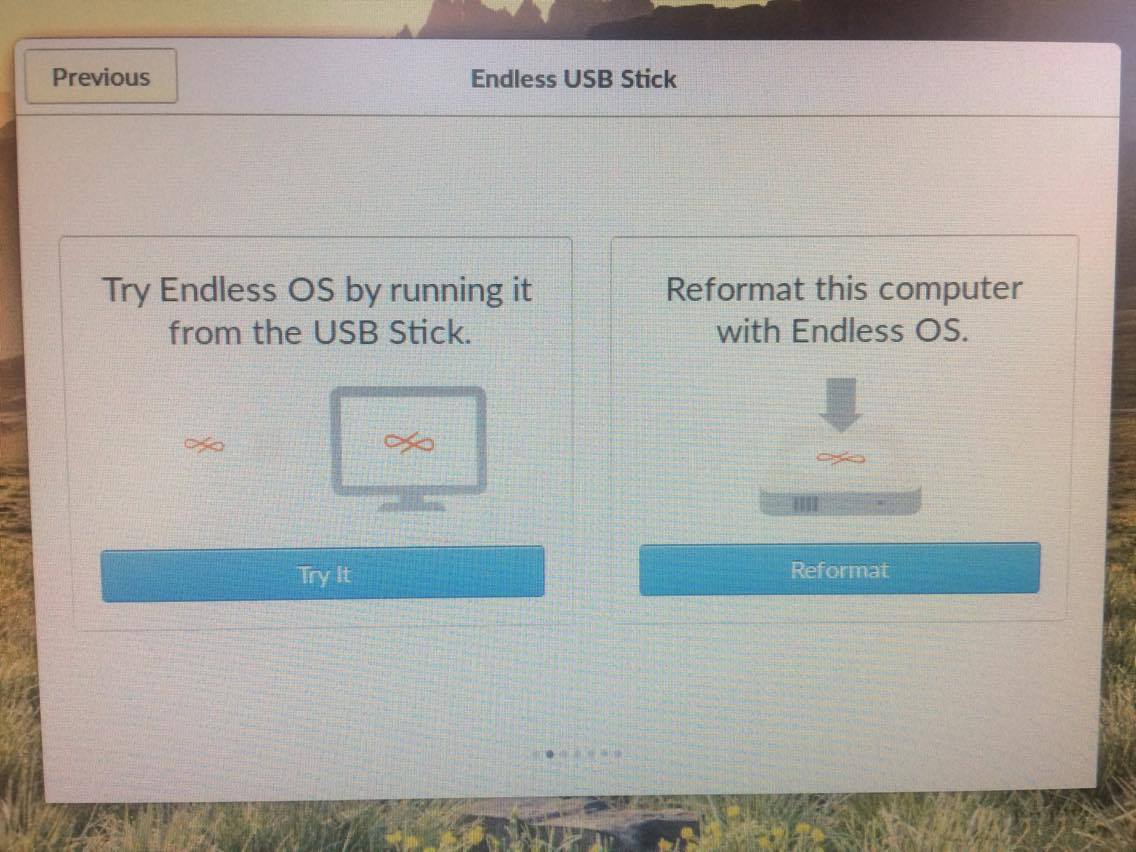
Reformat Option – is enabled with this method
This method doesn’t enable the “Reformat Option Menu”, when booting the USB. But this will allow you to create the Endless USB. I’ve used this method when the
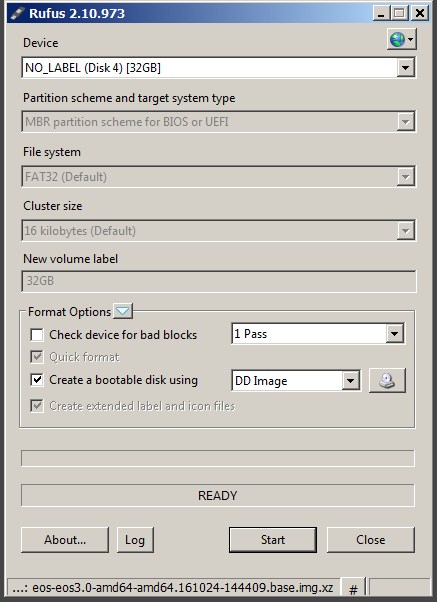
endless-installer.execrashes on my Windows 7 machine.Let’s start off with this method, download Rufus Image Writer software from this page. In my case, I downloaded the portable version.
Once downloaded, fire up the app and choose your target USB device or SD Card using Device selector menu.
For
partition scheme and target system typeoption, selectMBR Partition Scheme for BIOSor UEFI. This settings had worked for me.For File System option, choose Fat 32.
Then use the CD Drive icon to choose the Endless OS image. Select the file with
.xzfile extension. Make sure that you disable theHide extension name for known file typeoption in Windows. Because if you don’t, you won’t see the right file extension. Watch the video below to know how you’d exactly do that.Reference Video: USB Stick Using Rufus
When all is set, hit the Write button menu and would be it!
Reference Image:

Rufus Image Writer Config for Endless OS
From a Linux Mint machine or Ubuntu, fire up USB Image Writer. You can use similar App, if using a different Linux distro.
Under
Write Imagefield, point to your downloaded.imgfile. You need to extract first the.xzfile to get the.imgfile. Else, USB Image Writer won’t be able to detect the file.Next, select your USB Drive. You need at least 8GB for the Basic version, while 32GB for the Full version.
Click write whenever you’re ready. This process will take a while, especially when using the Full Version, which is around 14GB.
Reference Image:

Write Endless OS Image on USB using Linux
Note: With this method and “For Windows – Method 2”, you will not have the “Reformat this computer with Endless OS option, when you boot off your PC with this. You can’t use it to install Endless OS on your hard drive.
If you wanted to created a Endless OS USB installer, then use “For Windows – Method 1” – the official method of USB Stick creation.
Insert the newly created Endless USB or SDCard to your target computer.
- Set your target computer’s BIOS settings to boot from USB (for Bios enabled PCs) or enable EFI (for EFI capable PCs).
Watch your screen, EOS splash screen should appear.
Wait for it until it reaches the “Welcome to Endless!” screen.
Setup your computer by simply following what the wizard tells you to. Hit next, next… ’till you reach the “Create a Personal Account” screen.
Enter your name and desired password, then click next.
Continue doing what the wizard tells you to until you reach the Desktop.
Reference Video: Setup your PC after Install
Done! You should have reached the Desktop now, after setting your username and password.
Basic Version:

Here’s how Endless OS Basic Version’s Desktop looks like
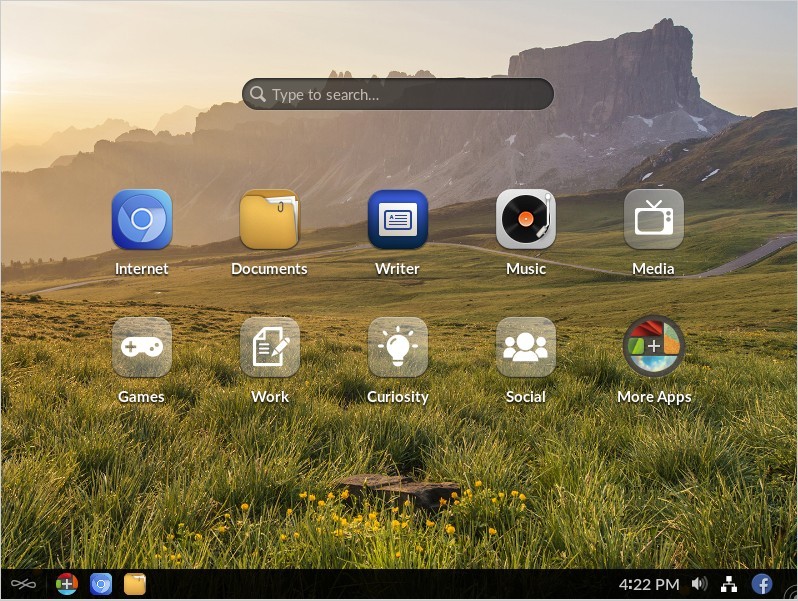
Full Version:

Here’s how Endless OS Full Version’s Desktop looks like

Method 2: Installing Endless OS On A Hard Drive, Instead of USB
EOS is awesome! It should be more awesome if you install it directly on your hard disk, making it run faster compared to USB stick’s performance.
So, if you thought of putting EOS permanently on your PC and use it as your main OS, read on.
The method below can be very useful in multiple PC deployment, by using one core image.
Possible Methods of Installing:
Method 1: Using Endless-Installer
This method is the simplest, you only have to download the installer and fire it up.
But it may become complex when you run through issues, like app crashes, hungup, or write failed issues.
Procedure
Step 1: Download the installer from this page.
Click on Download from Windows tab then hit the
Download Nowbutton.Expected file name should be
endless-installer.exeStep 2: Launch the
.exefile, then click “Install Endless OS” button on the wizard window. If you haven’t downloaded the Endless image yet, the wizard will ask you to download either the Full or Basic version.In case you already downloaded the image, then just copy the
endless-installer.exeand paste it into the folder where Endless files are located.Step 3: Choose your Endless version and download.
Click either Basic (1.6GB) or Full version (14GB) to download. After this, the wizard will verify the downloaded image and when no issues found, it continues with the installation.
Step 4: Reboot, then Select Endless.
After installing, restart your PC and choose Endless from the Boot loader Menu. Your system should now be a dual-boot system. Congratulations!
How To Uninstall Endless OS in Windows?
To uninstall or remove Endless OS in your dual-boot system, simply run the endless-uninstaller.exe file located in C:\endless\ folder of your Windows system.
Method 2: Using Clone Method
Whatever issues you’re having in creating the EOS USB stick, use this method to work around it. It should help you install on a hard drive.
This method involves booting from a Live CD and using the tools called Gparted and Clonezilla.
Also, you must’ve already installed EOS on your USB stick. In case you haven’t done it yet, then you must strictly follow the Windows-based or Linux-based guide. Else, this method will fail.
Requirements
- Endless OS Image (Basic or Full)
- USB Drive, 8GB for Basic, 32GB for Full Version – with EOS already installed.
- Live CD called Hiren’s Boot CD v15.2 – which you can download from here.
Install Summary:
- Set PC to boot from CD.
- Select and launch “Linux based rescue environment (Parted Magic 2012-10-10)
- Create a partition table for your empty hard disk.
- Launch Clonezilla and clone your EOS USB Stick to your hard drive.
- Resize/Expand your hard disk.
- Reboot and Test.
- Done!
The Step-by-step Guide
Step 1: Set your PC to boot from CD first, using your BIOS settings. Or, you can just tap the hot-key (while booting), and select your boot device.
Hot key varies from pc-to-pc, in my case it’s
F12.Once set, save and reboot.
Step 2: Select and launch “Linux based rescue environment (Parted Magic 2012-10-10)
When you reach the Menu, select this item to launch the Linux-based desktop environment.
Step 3: Create a partition table for your empty hard disk.
For new or newly formatted hard drive, or has content that you would want to erase so you could place EOS on it, create a new partition table using Gparted tool. It should clean up your hard disk and make it ready for this step.
Launch Partition Editor from the Desktop, then select your target hard drive. In my case, it’s
/dev/sda.Click
Devicemenu, then clickCreate Partition Table, then hit apply button.Here’s a video demo on how you would do that.
Reference Video: Hard Disk Preparation
Step 4: Launch Clonezila and clone your prepared EOS stick to your target hard drive.
Clonezilla must detect both of your devices, your USB Stick and Hard Drive. If not, then you must reboot your PC and boot again from the CD. If else fails, double-check your connection.
To check if Clonezilla detects your drive/usb-stick, launch a terminal and type in
fdisk -l. It should output your devices. Below is a video demo on how you should do it.Reference Video: Device Detection
To clone, launch Clonezilla – click “Disc Cloning” icon from the Desktop.
Then select
device-deviceoption, this means you want to clone between devices. Use arrow keys to select and enter key to activate.Next screen, choose
Beginner mode, thendisk_to_local_disk.Then choose your source device, this should be your EOS USB Stick.
Next, choose the hard disk as your local disk target, and hit OK.
On the next screen, choose
Skip checking/repairing source file systemto make the clone process faster.Click Next, or
y+ enter key when prompted on the next screen.Then, the actual cloning process should start. It may take a while. Once done, you need to launch Gparted again to resize your hard disk.
Step 5: Enlarge your Hard Disk.
You need to do this so you can use all the available space on your HD. Remember that it was cloned from your EOS stick, and that stick was also cloned from an image file (1.6GB for Basic / 14GB for Full version). It takes the size of the image (extracted image).
Launch Gparted again and select your HD. If warning pops up, just click fix and move on.
Click on the item labeled
ostree, then drag the slider on the colored white block. Drag ’til the end and clickResize/movebutton.Hit Apply key, wait for a while, and you should be done!
Step 6: Reboot and Test.
Logout from the Linux-based desktop and reboot your PC. You will have to set your BIOS again to first boot from your HD.
If successful, you should see the Endless OS splash screen, then the Welcome screen.
At this point, you have succeeded and installed Endless on your HD.
Method 3: Install on a Virtual Machine using VirtualBox
This method involves another App called VirtualBox – a general purpose hardware virtualizer. You can launch a VM or Virtual Machine and install any supported OS you want. It supports Unix/Linux and Windows.
We’ll be using this app with this method.
Actually, you don’t to install EOS here. You only have to clone the image to a compatible VirtualBox hard disk image. In that case, it would be a .vdi virtual hard drive.
So here we go!
How To Install Endless OS on a Virtual Machine?
To install EOS, you need VirtualBox and the Endless Image (Basic/Full).
You need to extract the .xz file to a .img file. Once done, do the following steps.
Step 1: Download and Install VirtualBox.
I would not cover this step in-depth, but the installation is pretty straight-forward, both on Windows or Linux.
Step 2: Create a new virtual machine.
Launch VirtualBox and click NEW button.
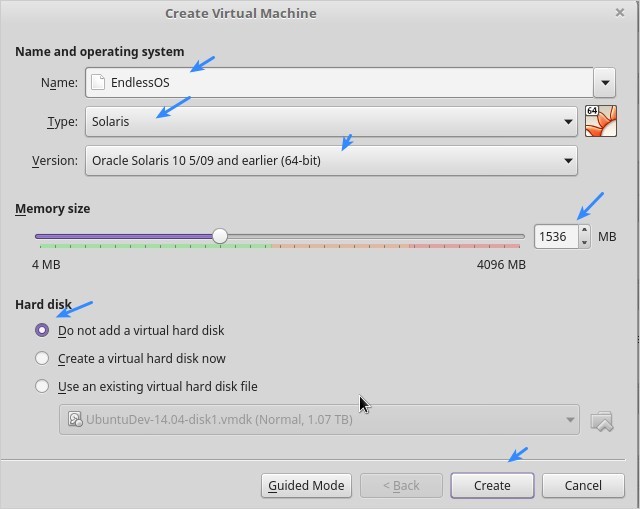
Just create the VM, do not add a virtual hard disk yet.
Note: For some reason, when creating the VM, typing
EndlessOSon the Name field will auto populate the fields; Type, Version and Memory Size like so:- Type: Solaris
- Version: Oracle Solaris 10 5/09 and earlier (64-bit)
- Memory Size: 1536
This is with my VirtualBox version
5.1Using the settings above works, but you could also create a Linux based machine with this.

Reference Image: VM Creation for Endless OS
Step 3: Clone/Convert the Endless Image to a compatible VirtualBox hard disk.
If you’re on Linux:
Launch a terminal (
ctrl alt + t) and type…VBoxManage convertdd /path/to/your/eos-image.base.img /path/to/folder/your-vb-hd.vdiThe idea is
command+ source + destination, like below:VBoxManage convertdd source.img destination.vdiIf using Windows:
Launch command prompt by typing
cmdfrom the RUN menu.Then
cdtoC:\Program Files\Oracle\VirtualBoxThen…
VBoxManage.exe convertdd source.img destination.vdiStep 4: Next, attach the
.vdifile as your VirtualBox hard drive, and that would be it!Step 5: Fire up your Endless VM and pat your self on the back. Congratulations, you made it!
That’s not hard right? You only have to convert the image then attached to a VM. Easy peasy!
Reference Video:
It’s a Wrap!
That’s how you would install Endless OS, using a variety of methods, on various scenarios.
If you only wanted to quick test the OS, then use the VirtualBox method, it’s the quickest way to run and test Endless OS.
If you ran through any problem while following this guide, or wanted to ask something, you may post your comment/question below and will respond whenever I could.
If this helped you, feel free to share it, but don’t copy/paste it!