This is a step-by-step guide that will teach you how to setup an Ubuntu-based media server. I’m gonna use a proprietary software called Plex Media Server. It’s is a software that you can use to organize and stream your media collection. It let’s you stream media to various multimedia devices like, Smart-TV, mobile phones, streaming players, and other multimedia applications (like XBMC).
It’s an awesome piece of software that you could build awesome projects upon it. In my case, I use it with my XBMC box, Android Phone and Smart-TV. You could install Plex in various supported platforms, and you could either install it with a GUI or GUI-less (headless) installation. But in this guide, I’m going to show you how to configure via command-line. I’ve chosen Ubuntu 14.04 LTS Server edition as my base-OS for this guide. If you wanted to use other OS as your Base, then you should read additional information below to know the various platforms it currently supports. If you wanted to use a Linux-based setup, and you want it headless, then read further and follow the steps enumerated below. Also, prepare yourself to be acquainted with Linux command-line.
Plex Media Server Supported Platforms
Plex’s latest version (0.9.9.12.504-3e7f93c as of July 2014) supports Windows, Mac, Linux and Free-BSD. You could build your own media server using any versions it currently supports, as your base operating system. I’ve listed down below the platforms and operating systems, that it currently supports.
- Windows
- Windows XP SP3
- Windows 7 * Windows 8
- Mac * Mac OS X 10.6.3 Snow Leopard or Later
- Mac OS X 10.7/10.7.x Lion
- Mac OS X 10.8/10.8.x Mountain Lion
- Mac OS X 10.9/10.9.x Mavericks
- Mac OS X 10.10/10.10.x Yosemite
- Linux Ubuntu * 10.04 LTS Lucid Lynx
- 10.10 Maverick Meerkat * 11.04 Natty Narwhal
- 11.10 Oneric Ocelot
- 12.04 LTS Precise Pangolin
- 12.10 Quantal Quetzal
- 13.04 Raring Ringtail
- 13.10 Saucy salamander
- Ubuntu 14.04 LTS Trusty Tahr
- Fedora 14 – 19 * CentOS 6 or Newer * FreeBSD 9.1
Minimum System Requirements
You also must know the hardware requirements so you could tell whether you choice of OS and hardware components have met Plex’s minimum requirements. Your choice of hardware must at least meet the minimum, to install Plex successfully. If you have higher requirements and probably wanna build a kick-ass media server, then you should go more than the minimum. Read further below to see the nominal requirements.
Standalone Implementation – No Transcoding
The nominal requirements would be enough to install and run Plex, if you don’t intend to encode and transcode media files with your machine. Also, if you don’t intend to install and run other CPU intensive applications and background services, the minimum requirements would be sufficient to start with. But in my opinion, I think it’s better to start with a more powerful CPU, with a minimum amount of memory. Because it is easier to upgrade a memory than a CPU. You just throw another stick of ram and you have an upgrade. This is not the case of CPU, you have to change the whole processor and buy another one to have an upgrade.
Note: These are just guidelines, only to give you an idea or ballpark estimate of what hardware specs your box may require. This serves as base unit, so it’s better to use more than the minimum, so long as you could and has the resources to acquire the hardware components. Requirements: * At least 1.6Ghz 2-Core processor (Intel Core 2 Duo or AMD X2 Series) * At least 1 GigaByte of Memory, if you’re on Mac or Windows * At least 512MegaByte of Memory, for Linux * Hard Drive, at least 80GB
With HD Encoding or Transoding Capability
If you wanted your Plex box to have the HD encoding or transcoding capability and at the same time, serves and stream media to several media clients, the following requirements are suggested.
Requirements:
- For single instance 720p HD file transcoding: 2-Core 2.0GHz CPU
- For single instance 1080p HD file transcoding: 2-Core 2.4Ghz CPU
- For multi-instance 720p & 1080 HD file transcoding: At least 4-Core CPU
- At least 2GigaByte of Memory
- H.264 Capable Video Card, if you want a GPU based encoding. (More about this in my next post.)
Plex Media Server, Headless Ubuntu 14.04
Installation If you have the box that met the minimum requirements, then you may now proceed with the following procedures. Plex Media Server supports Windows, Mac, Linux and FreeBSD, but in this guide, I’m going to show how you would install it in a server edition of Ubuntu 14.04 LTS. The following steps below will walk you through, on how to set things up. This is going to be a headless and standalone setup. That means, no monitor and peripherals attached. But we need to attach those during the installation and initial setup. Before you start with this guide, you must have already downloaded the latest version of Ubuntu (14.04.1 LTS as of July 2014) and burned it to a DVD disc, and your machine meets the nominal system requirements for a stand-alone PMS installation. Please read the necessary things you need for this guide, below.
Things you need:
- Comfortable wit Linux commands
- Putty (from http://putty.org), if you’re on Windows
- Extra device for testing (Android or iOS device, streaming player or similar)
- A clean and fresh hard-drive with at least 80GB free space
- Separate hard drive for media files (optional)
- Hardware components that meets the minimum requirements
- A configured DHCP server This guide is broken into a two-part series. For the first part, we will install our operating system, and that would be Ubuntu server edition. The second part would be the installation of the Plex software.
Part 1: Ubuntu Server 14.04 LTS Installation
For the first part, we install Ubuntu 14.04 as our base-OS. Below are the necessary procedures.
- Step 1: Power on your machine and set your BIOS settings to boot from CD/DVD.
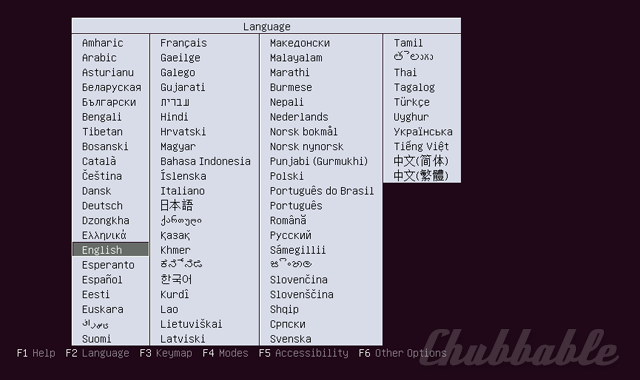
- Step 2: After doing so, insert your Ubuntu DVD installer and boot from it. When your machine successfully booted up, you’ll be prompted with a menu, similar to the image shown below.
 Select your desired language using your keyboard’s arrow keys. Navigate and highlight your language and then press enter to activate it. In my case, I choose
 English. - Step 3: Remember that we’re setting a headless setup of Ubuntu, so we’ll setup just the core files, plus OpenSSH server. So just choose
Install Ubuntu Serverby highlighting it with your arrow keys, and press enter. That should take you to the next step. - Step 4. At this point, you must choose your location. It is recommended to choose your real geographic location because Ubuntu will choose the most optimal mirror server for your current location. So if you choose
United States, Ubuntu shall configure the apt sources list to pick the most optimal servers that are located in the U.S. So in my case I’d choose Philippines. - Step 5. The next prompt will ask you if you want your keyboard be detected properly by the installer. If you have chosen a different language other than
Englishfrom the previous steps, and you have a different keyboard layout other than theQWERTYlayout, I suggest that you chooseYeshere. You should useTABkey to select a choice from this menu. If you selectYES, then you will be ask to press a series of keys. The installer will detect your keyboard layout properly depending on what keys you’ve pressed. In my case, I would chooseNo.Now, depending on your answer, if you choose
NO(like I did) the installer will ask you again if what is theCountry Originof your keyboard, In my case, I should chooseEnglish USand hit enter and the installation should start. But if you chooseYESto let the installer detect your keyboard, it will not ask you to select your keyboard’s Country of origin, instead it will start the installation process. - Step 6. After the above step, depending again on your setup, the installer will ask you to configure your network manually if it didn’t acquire a dynamic IP address. But if you have configured a DHCP server inside your network, and the installer automatically acquires an IP address, no prompt will pop-up. In case you need to configure your network manually, then you should follow the following steps.
- 6.1: Select and activate
Configure network manually. - 6.2: Then the installer will prompt you to input your desired IP address. Enter your IP address, it should have the same subnet as your existing network. In my case, I have a subnet of
192.168.1.xxx, so I would input my IP like so,192.168.1.99. Then hit enter to continue with the next step. UseTABkey to selectCONTINUE. - Step 6.3: Enter a subnet mask, in my case,
255.255.255.0. - Step 6.4: Enter your gateway IP address, this should be your router’s IP address. In my case,
192.168.1.1. - Step 6.5: Enter you name server address, this should also be your router’s IP address. In my case,
192.168.1.1. - Step 6.6: Select and activate
Continuebutton. You should be taken to the next step. You’re done with the manual network configuration.
- 6.1: Select and activate
- Step 7: You’ll be prompted to enter your desired host name with this step, so enter your host name. This will be the name of your box/machine that you could identify from your local network. You may name it like,
ubuntu-headlessor any name you can think of. It could be planet names or celebrities. In my case, I’ll name itubuntu-plex. - Step 8: The next step will ask you for your domain name. But since this host will only be used inside the local network, we could just make something up. So in my case, I would name it
chubbable.loc. Now we have configured our domain name. And when a domain name is attached to a host name, it makes the host name a fully qualified domain name. But this setup is just for local network. You don’t really have to register a domain name. In my case, my fully qualified domain name for my setup would beubuntu-plex.chubbable.loc. - Step 9: Next, enter your name, your desired username and password.
- Step 10: The installer will ask you if you want your home directory encrypted, since this is just a basic and simple setup, we may choose
Noto not encrypt home directory. - Step 11: Choose your time zone. If you want to choose another time zone, then you should choose
NOwhen asked ifIs this time zone correct? In my case, it automatically selects my desired time zone, which is Asia/Manila, so I’d answerYes.Note: The installer can only select your Country automatically when your machine is connected to the Internet. It selects your Country based on your detected public IP address.
- Step 12: Choose a partitioning method. By default,
Guided - use entire disk and setup LVMoption is selected. I recommend to just implement it and hit enter to start partitioning. Select your hard disk and press enter to continue. In my case, I have a 80GB Sata hard disk. When asked toWrite changes to disk and configure LVM, answerYes. Another prompt will ask you, Write the changes to disk?, answerYesand the partitioning process should start. After this process, a prompt will ask you to configure a HTTP proxy, you may skip this by hittingContinuebutton and proceed with the installation. - Step 13: After the previous step the install process should start, you can sit back and relax while the installer applies your settings. During this process, another prompt will pop-up asking you how you would manage upgrades on your system. You should choose
Install security updates automatically. Another prompt will ask you if what software to install. Since this is going to be an Ubuntu headless setup, you would selectOpenSSH Serverpackage, and you may selectSamba file serveras well (you can use this service later on with your media file management). To select a package, use arrow keys and space-bar to activate it and hitContinuebutton to continue. In the final part of this process, another prompt will ask you if you wanted to install GRUB bootloader to the master boot record. You should answer Yesto continue. That would be it, hitContinueonce more to finalize the install process. Your machine should reboot and should take you to a black-screen login prompt. Congratulations! You have now installed a GUI-less Ubuntu 14.04. You may now continue with the next phase of the server setup.
 Select your desired language using your keyboard’s arrow keys. Navigate and highlight your language and then press enter to activate it. In my case, I choose
 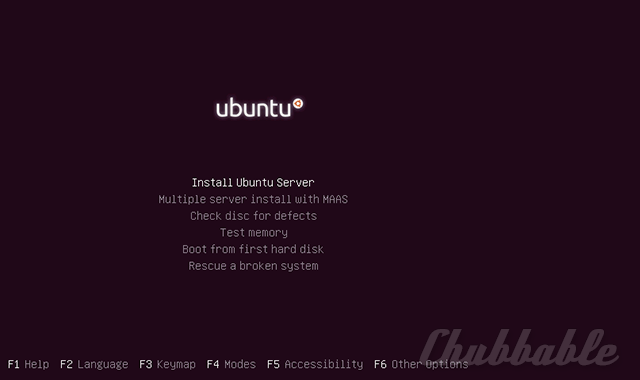 That should take you to the next step.
 So in my case I’d choose

 In case you need to configure your network manually, then you should follow the following steps.


 In my case, it automatically selects my desired time zone, which is
  Another prompt will ask you,
  In the final part of this process, another prompt will ask you if you wanted to install GRUB bootloader to the master boot record. You should answer
 Part 2 – A: Plex Installation Procedures for Windows Platform
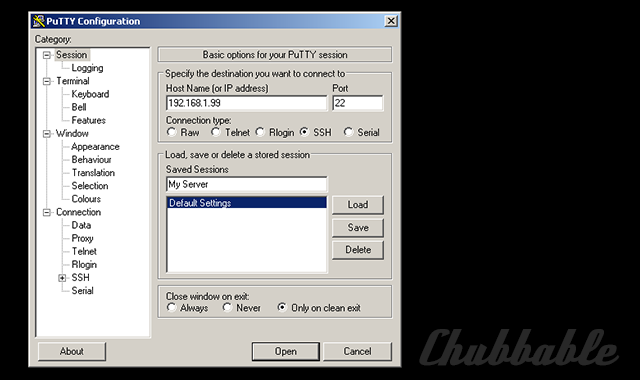
If you’re on windows, you need to have Putty.exe to be able to remotely connect to your headless server.
Step 1: Download and Install
putty.exe. You can download the software fromhttp://www.putty.org. You dont’ need to install it, just double-click theputty.exeto launch it and follow Step 2 below.Step 2: Enter your Ubuntu server’s IP address. In my case it is
192.168.1.99. Fill upSave Sessionsand enter something likeUbuntu HeadlessorMy Serveror any text you might want, then click save.Step 3: A new entry should appear right below the entry,
Default Settings. Look for the entry that you’ve created from Step 2 above. Select and clickLoadbutton, then clickOpenbutton. A new window and prompt should appear. ClickYesto continue.Step 4: You should be now at the log-in prompt. Enter your username and password. The one you entered during the Ubuntu 14.04 server installation. When you’re logged in, you should see a window similar to the image shown below.


- Step 1: Fire-up your browser and head over to
plex.tv/downloads. Then clickCOMPUTERbutton, a pop-up window should open. - Step 2: Click
Linuxtab and scroll further below, right-click on64-BITbutton just below theUbuntutext and selectCopy link location. Minimize the window and switch-back to your Putty session.


- Step 3: Type-in
wgetand thenspace. Then paste what you have just copied (copy link location) in the Putty.exe window. To do this, just right-click on it to paste, then hit enter. It should download the latest version of Plex software. Wait for it to finish then proceed to the next step.


- Step 4: After downloading the file, install it by using the following command:
sudo dpkg -i plexmediaserver_0.9.9.12.504-3e7f93c_amd64.deband hit enter. You’ll be prompted to enter your password, enter your password and hit enter.
Note: When you type your secret-pass, your screen won’t print it.
Installation should start when you typed-in your pass-phrase correctly.
TIP: Noticed that the Plex software installer has a very long file name, to help you out a little bit, you may do the following: Type
sudo dpkg -ithenspace, then typeplex, and then hitTabkey. It should auto-completes the file-name.
- Step 5: If you encountered an error during install process, do this: type
sudo apt-get install -fand hit enter. When ask if you want to continue, answeryand hit enter. Installation should resume. - Step 6: After the above installation step, we now test the server and see if Plex was installed properly. So let’s do that now and fire-up a browser. To access Plex’s web-based control panel, you would type-in your server’s IP address plus port number, then directory name
manageThe format is like this:ip-address:port-number/manageSo you would type like this in your browser’s address bar:
192.168.1.99:32400/manageSubstitute 192.168.1.99 with your machine’s IP address. Port Number 32400 is Plex’s default port it listens to, for web administration.
If you see a web-page similar to the image below, then you have setup Plex media server correctly. Now click
Agreebutton to accept the software terms of service. At this point, you can now configure and administer your server remotely from any machine within your local network. You’ll be using a lot of command-line syntaxes when you configure your Linux server and when you add or install additional modules/packages to it.
 At this point, you can now configure and administer your server remotely from any machine within your local network. You’ll be using a lot of command-line syntaxes when you configure your Linux server and when you add or install additional modules/packages to it.
 Part 2 – B: Installation procedures for Ubuntu-based Platform:
Installing Plex Media Server from an Ubuntu-based OS (Ubuntu Deskop or Linux Mint) is very similar to the steps we’ve taken previously. The only difference is, we don’t need to download
Putty.exe or similar software. We only need to open a terminal and type in… ssh [email protected]. A window will pop-up asking you if you wanted to continue, just type yes and hit enter. You could now move on and follow the procedures from “To Install Plex Using SSH In Windows” above. Sample Screen From LinuxMint Command Prompt:


Tip: You could copy-paste an applicable command to a command-line. To paste a copied text or snippet to a Linux terminal, click middle mouse button.
That’s a Wrap
This is my “How-to” guide on how to setup a headless media server with Ubuntu 14.04 & Plex Media Server software. I hope you find this post helpful. Installation wasn’t that difficult, but in case you’ve gone through issues and wasn’t able to follow the guide or stuck on certain part, just feel free to ask and I’d be happy to help you. Just put your comments and questions below. But wait, your Linux server won’t be called a Media Server, without media files added to it. So we have to copy files to it and add those files to Plex’s Media Library. I’m going to write a “howto” for this, so checkout my next post on how to add files in your newly configured headless media server.