Another step-by-step guide on how to install a Point-of-Sale software called uniCenta (v4.4.2), you need; 64-bit supported OS, Java SE Runtime Environment, and the latest version of uniCenta installed. v4.4.2 is the latest version (for x64 OS) at the time of writing this guide.
So, on this step-by-step guide, we’ll be using Linux Mint 19 Mate 64-bit Edition as our host OS for uniCenta. Though you can use Ubuntu 18.04 Desktop Edition or Linux Mint Cinnamon with this procedure, since LM is based on Ubuntu.
Please take note that in this post, when I mention UC, I mean uniCenta. And when I mention LM, I mean Linux Mint.
Overview of the installation
Before getting started with this guide, make sure you already have a clean and working instance of LM 19 (64-bit) or Ubuntu 18.04 64-bit Desktop Edition. As I can’t post the guide for now.
- Setup a clean instance of LM 19 (64-bit) or Ubuntu 18.04 64-bit Desktop Edition .
- Download the 64-bit version of Java JRE then Install
- Download and Install UC 4.4.2
- Create Launcher for UC 4.4.2 in Linux Mint 19
Note: 4.3.2 version of uniCenta is for 32-bit/x86 OS only.
Procedure
I like to mention again that we’ll be using Linux Mint 19 Mate 64-bit version and Unicenta 4.4.2 64-bit. So, to easily follow this guide, I highly recommend that you should use the same version and architecture. Once you learned the process, it would be easy for you to install any version you’d want. Further more, using the same setup as mine, you can just copy/paste the command or copy part of it and make necessary adjustment.
Also take note of this YouTube video link, you could use it as video reference along with this guide.
The Step-by-step Guide in Installing Unicenta 4.2.2
Step 1: Setup a clean instance of Linuxmint 19 (64-bit) or Ubuntu 18.04 64-bit Desktop Edition.
Install LM 19 64-bit edition with the Mate Desktop environment. This version is a better choice for low resource PC.
Sorry, I don’t have the tutorial part for this particular step.
If you already have a working LM19, then please proceed to Step 2.
Step 2: Download the 64-bit version of Java JRE then Install
To download the latest Java JRE, which is compatible with the latest version of UC, head over to Java SE Runtime Environment 8 Download Page.
Note: If we are using a distribution based on Ubuntu, it might already have OpenJDK Java installed, like LM 19 or Ubuntu 18.04 does. But we need “Java SE Runtime Environment 8u20x” to successfully run UC. So in this step, we need to install and configure Java JRE.
Step 2.1: Download JavaJRE for Linux Mint 19 64-bit
We need to download the compatible version, in our case, we need the 64-bit version for Linux with the tar.gz package. At the time of writing this guide, the latest compatible version are 8u201 and 8u202.
With this guide, we’ll be downloading the 8u201 version. The right package is jre-8u201-linux-x64.tar.gz
Reference Image:
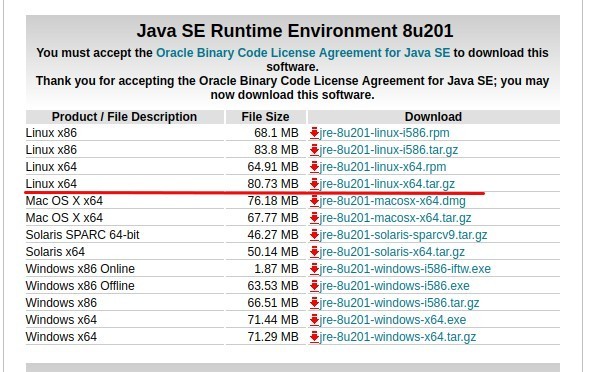
Reference Photo: Java JRE Download Page
So, now let’s go to our LM 19 Mate Desktop and launch Firefox, download jre-8u201-linux-x64.tar.gz and extract it. Take note, you need to tick the “Accept License Agreement” before you can download the package.
Step 2.2: Extract JavaJRE Package
Once downloaded, extract the jre-8u201-linux-x64.tar.gz package using LM‘s GUI. Browse to the file location, right-click on the file and click Extract here.
In Linuxmint, the default download location for Firefox is in /home/your-user-name/Downloads.
Step 2.3: Move The Package
After extracting the package, you should have a new directory named jre1.8.0_201.
Next, move the whole jre1.8.0_201 directory to the /opt directory. In Linux, this directory should hold all the 3rd-party apps. To do the move, we need to launch a terminal and use the command-line to move the entire folder.
So, launch a terminal, use hot-key ctrl + alt + t, then type in:
cd ~/Downloads
…to go to the download location of the Java JRE package. In case you downloaded the package to somewhere, then you have to cd to that location first.
Next, from the Download location move the entire package to /opt directory. To do that, enter the following command and hit enter key:
sudo mv jre1.8.0_201 /opt/.
The JRE package should now be in /opt directory. To confirm, enter command ls -l /opt. Be sure to include the . at the end of the command.
Sample output:
drwxr-xr-x 6 chubbable chubbable 4096 Feb 28 04:50 jre1.8.0_201
Step 2.4: Install The Java JRE Package
Install the JavaJRE package for Linux Mint 19 and make it the default Java for UC. Let’s set a higher priority number to make it the default. In our case we set it to 110.
Type command and press enter key:
sudo update-alternatives --install /usr/bin/java java /opt/jre1.8.0_201/bin/java 110
Next, type below command and press enter key:
sudo update-alternatives --config java
Then select the number that corresponds to the Java JRE version we downloaded in Step 2.1. In our case, it is jre1.8.0_201/bin/java inside the /opt directory. So, choose the number that matches it. In our case, it’s Selection 1.
So, type in 1 and press the enter key.
Sample output:
sudo update-alternatives --config java
There are 2 choices for the alternative java (providing /usr/bin/java).

  Selection    Path                                         Priority   Status
------------------------------------------------------------
* 0            /usr/lib/jvm/java-11-openjdk-amd64/bin/java   1101      auto mode
  1            /opt/jre1.8.0_201/bin/java                    110       manual mode
  2            /usr/lib/jvm/java-11-openjdk-amd64/bin/java   1101      manual mode

Press <enter> to keep the current choice[*], or type selection number: 1
update-alternatives: using /opt/jre1.8.0_201/bin/java to provide /usr/bin/java (java) in manual mode
Step 2.5: Set User Environment for Java JRE
Set environment so Linux Mint users can use your configured Java JRE location.
Command should be:
sudo nano /etc/environment
Expected screen output should be similar to the following:
PATH="/usr/local/sbin:/usr/local/bin:/usr/sbin:/usr/bin:/sbin:/bin:/usr/games:/usr/local/games"
Now, below that line of text, insert this line (location of Java JRE directory):
JAVA_HOME="/opt/jre1.8.0_201"
Next, save the file (ctrl + 0) then exit the editor (ctrl + x).
Next, while still in our terminal, type:
source /etc/environment
No text output will appear, but to verify, type:
echo $JAVA_HOME
Expected output in this case is:
/opt/jre1.8.0_201
If you get the output above, then you have successfully installed Java JRE for Unicenta 4.4.2.
But, we’re not ready to install uniCenta yet, we need to reboot our machine. To reboot LM from commandline, simply type: sudo reboot.
Once rebooted, you’re now ready to install uniCenta 4.4.2. The Step-by-Step Guide to do this is below.
Step 3: Download and Install Unicenta POS 4.4.2
Step 3.1: Downloading the Installer
To download uniCenta 4.4.2 or any community version, go to their Sourceforge Repo and download the package for our OS. In our case, we should download the Installer for Linux 64-bit edition.
For this guide, we need the file with the name: unicentaopos-4.4.2-linux-x64-installer.run
Step 3.2: Run the Installer
To run the installer, you need to have administrative privilege. In Linux, the user account you’re using should have a sudo privilege. In simpler term, the user should be a member of the sudo group. If all are set, then we can now run the installer.
We can run the installer from the commandline or using file explorer with the right-click context menu.
From Commandline
To run from commandline, you need to use sudo command + the path to the installer file with .run file extension. To do this, type in:
sudo ./path/to/unicenta/installer.run
In our case, the installer was downloaded to our Downloads directory, since it is the default Download directory for Firefox.
Sample command:
sudo ./home/chubbable/Downloads/unicentaopos-4.4.2-linux-x64-installer.run
In case we save the installer somewhere, then we need to use that path with the command.
Notice the dot (.) there before file path? You need that to run the installer.
The command will prompt us to type our password, after hiting Enter key. Then, installation continues.
From Right-click Context Menu
WE can also run the installer using the file browser by right-clicking on unicentaopos-4.4.2-linux-x64-installer.run and click Run As Administrator.
Reference Image:
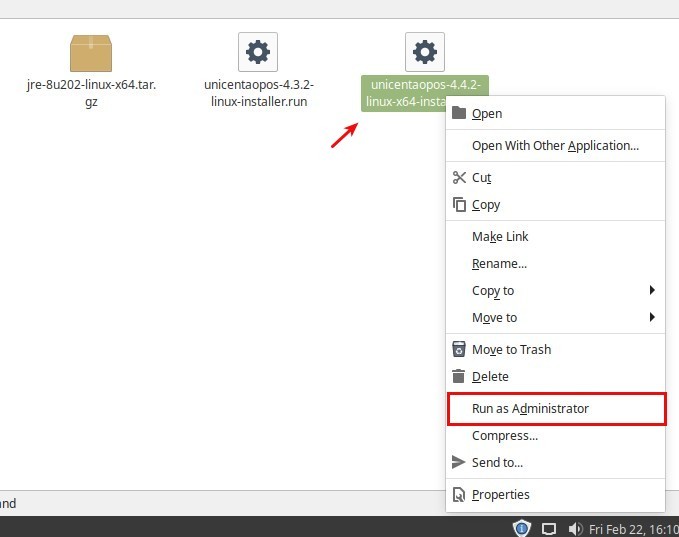
Reference Image: Run the uniCenta Installer on Linux Mint
This step will require us to type in our password. Make sure the user account that we use during this step, should be a sudo user.
After successful authentication, this dialogue will pop up (langguage selection):
Reference Image:

Reference Image: uniCenta Language Selection Dialogue
Choose your preferred one and click OK.
Next, select the right Java JRE. In our case, we should pick the one in /opt/jre1.8.0_201. So tick that choice, then go through the process and finish the installation. We need to accept the License Agreement, and accept the recommended uniCenta install directory for Linux – which is /opt/unicentaopos-4.4.2.
At this point, we should have installed uniCenta successfully. We can now proceed to the next step below.
Step 4: Create a Launcher
To create the launcher, we simply need a new file and name it whatever we want, but should have a file extension of .desktop. We can name it like uniCenta Launcher or anything we may come up with.
For the sake of demonstration, We’ll name the launcher as uniCenta. But before we proceed, we need to take a test launch.
Step 4.1: Test Launch
We need to run the app using the supplied start.sh file. We can launch the app from command-line using sh command.
So let’s get started.
Launch a terminal and go to uniCenta app directory:
cd /opt/unicentaopos-4.4.2
Set execute permission for all .sh file, so users can use the app from their own user account:
sudo chmod a+x *.sh
Launch start.sh:
sh start.sh
If it fails due to the following errors or similar:
bash: ./start.sh: /bin/sh^M: bad interpreter: No such file or directorystart.sh: 28: start.sh: Syntax error: word unexpected (expecting "in")
…then we need to fix the problem first, using the guide below.
If there are no errors, we can exit the app for now, then configure later. We can now proceed to the “App Launcher Creation” Step.
Fix start.sh Syntax Error
These are two possible errors thrown when launching the App using start.sh, it’s either:
/bin/sh^M: bad interpreter: No such file or directorySyntax error: word unexpected (expecting "in")
We need to fix the issue first before making the app launcher. Basically, the problem with the start.sh file is due to the improper line ending format. It should have a Linux/Unix compatible line ending format, instead of Windows DOS format. .sh files are unix (linux) shell executables files, and therefore be saved with the proper format.
That said, we can fix the issue by converting the file’s line ending from Windows to Unix/Linux format.
To do that, simply open the file using the built-in text editor in LM 19 called Xed, then save it without modifying anything. When saving, use Save As menu, then choose Unix/Linux format for the Line Ending.
Command to type in our Terminal:
sudo xed /opt/unicentaopos-4.4.2/start.sh
Of course, we need to use the right file path if we installed uniCenta in a directory different from what is recommended in this tutorial.
Reference Image:
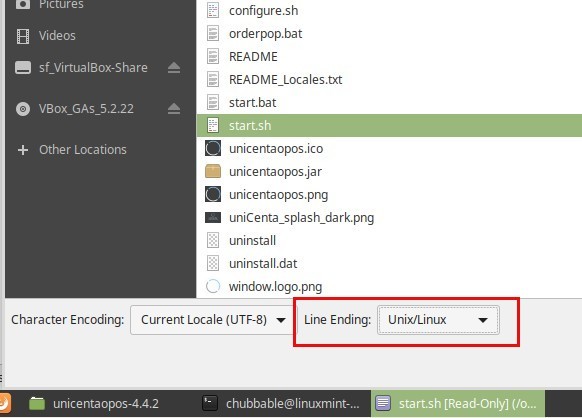
Reference Image: Fixing the uniCenta SH Error
Step 4.2: Create a Launcher for Unicenta 4.4.2 in Linux Mint 19
After a successful test launch, we can now proceed to next step.
To create a launcher for uniCenta 4.4.2 in Linux Mint 19, we need to launch a Terminal and type in:
nano ~/Desktop/uniCenta.desktop
Then copy the following block of text and paste it inside the window. To paste, ctrl + shift + v. Then save the file, ctrl + o and hit enter key.
#!/usr/bin/env xdg-open
[Desktop Entry]
Version=1.0
Type=Application
Terminal=false
Name=uniCenta
Comment=Launch Unicenta
Exec=/opt/unicentaopos-4.4.2/start.sh
Icon=/opt/unicentaopos-4.4.2/unicentaopos.ico
We should now have a neat looking shortcut icon on our desktop.
Reference Image:

Reference Image: uniCenta Desktop Launcher
Now, double-click to launch it! If you’re greeted with a message mentioning about Untrusted application launcher, dont fret. We can safely ignore it and simply click on Mark as trusted. The next screen we’ll see is the Database manager message, saying “unable to connect to the database”. This is normal since it’s the first time to launch the app. So what you should do is to click on OK, and proceed to configure the app.
Reference Image:

Reference Image: Untrusted Application Warning
And there you have it, uniCenta has been launched!
Now, make the necessary configurations like; database, company name, skin, logo and etc.
How To Configure Unicenta 4.4.2 oPOS with MySQL Database Server
In this section of the guide, we need to install mysql-server via the commandline. With version 4.4.2, Apache Derby Embedded Database is no longer shipped with uniCenta, and only MySQL database should be used.
MySQL Installation
To install MySQL for uniCenta, launch a terminal (ctrl + alt + t) and type the following command:
sudo apt update; sudo apt install -y mysql-server
That command should install the latest version of MySQL Server for LM 19 or Ubuntu 18.04 Desktop edition. Version 5.7 is the latest version at the time of writing.
Note: You can install the Database on the same machine with UC. Plus, you can use the database for other UC machines in your local network.
MySQL Basic Configuration & Database Setup
So once installed, we need to add a database for UC along with database user and password.
Let’s launch terminal if you haven’t already, and type in the following command:
sudo mysql
That will log us in to mysql commandline prompt (mysql>):
Next, we’ll create the database for UC:
create database unicentaopos;
Create database user and grant privilege to the unicentaopos database:
grant all on unicentaopos.* to 'unicentaopos'@'localhost' identified by 'Password';
Let’s break the command down and further explain it:
grant all on unicentaopos.*– This is the database we created'unicentaopos'@'localhost'– We are grantingunicentaopos(which is the database username) database privileges.identified by 'Password'– We are settingPasswordas the database user’s password. We can change this to something more secure.
So what did we set using the command above:
- Database Name –
unicentaopos - Database User Name –
unicentaopos - Database User Pass –
Password
uniCenta Database Setup
Next, we launch uniCenta and go to: System > Configuration > Database Setup
You should see similar page like this one:

Reference Image: MySQL Database Setup on uniCenta 4.x.x
Then we supply the database details:
Driver Library:
/opt/unicentaopos-4.4.2/./mysql-connector-java-5.1.39.jarDatabase:
MySQLDriver Class:
com.mysql.jdbc.DriverDB 1 Name:
Main DBDB 1 URL:
jdbc:mysql://localhost:3306/unicentaopos?zeroDateTimeBehavior=convertToNullUser:
unicentaoposPassword:
Password
Now, let’s test the connection and when successful, Click Save button and you should see a confirmation message. Click OK and then exit.
Reference Image:

Reference Image: Configuration Saved Successfully – Pop -up Dialogue
uniCenta 4.x.x Errors You Might Encounter

Reference Image: Warning Dialogue “Creation Script Did Not Run Successfully”
Creation Script Did Not Run Successfully
I ran through this error during uniCenta’s first launch. See reference image below.
If this issue is not fixed, you will go through an error when configuring employee’s shifts and breaks settings. So what you should do is to run a couple of mysql commands.
The below procedure fixed the issue for me.
Note: I installed uniCenta from scratch, then went through this procedure before finally launching UC for the first time.
The Fix
The solution is to edit SQL mode and disable NO_ZERO_IN_DATE,NO_ZERO_DATE.
On your Linux Mint or Ubuntu machine, login as root to MySQL.
sudo mysqlThen run the following commands successively. You may copy each command and paste it into your mysql command prompt:
First Command:
set sql_mode="ONLY_FULL_GROUP_BY,STRICT_TRANS_TABLES,ERROR_FOR_DIVISION_BY_ZERO,NO_AUTO_CREATE_USER,NO_ENGINE_SUBSTITUTION";Second Command:
set global sql_mode="ONLY_FULL_GROUP_BY,STRICT_TRANS_TABLES,ERROR_FOR_DIVISION_BY_ZERO,NO_AUTO_CREATE_USER,NO_ENGINE_SUBSTITUTION";
The Wrap Up
You should now have a working instance of uniCenta 4.4.2 on Linux Mint 19. In case things didn’t go well, feel free to comment below and I will help you with any installation related issues. Take note, that you can also use this guide with Ubuntu 18.04 Desktop instead of LM.
So I think that’s pretty much it for this guide. In case you ran through issues, feel free to comment below.
If this guide did worked for you, you can thank me by:
- Leaving your comment below
- Subscribing to my YouTube Channel, and keep subscribed. And don’t forget to hit that notification bell icon.