Installing OpenCart Themes is not difficult as you might think. But for newbie webmasters or people who are knew to this kind of stuffs, it could be a big puzzle for them. So in this post, I will discuss the step-by-step tutorial on how you would do it correctly and error free. On this article, I’ll be using the latest version and that is version 2.3.0.2, as of writing this post.
Jump Links
- Localhost Installation
- Cpanel Installation – FTP
- Changing a Theme
- Quickest and safest way to install a Theme
- Quick Summary of the Steps
Also Read: Choosing The Best OpenCart Theme
The difficulty of setting up a Theme depends how complicated your Theme is, but regardless, an install manual is always packed and included with your purchased Theme. You should be able to successfully install the theme using the manual. In case you still have issues, contact your developer who’s contact info is also included in the zip file.
A Theme Pack is usually a ZIP File, inside it, is folder named “upload”. This is a packing convention for OpenCart Themes and developers are required to pack their themes like this. All files and directories inside the upload folder shall be copied to OpenCart’s Theme directory or as per instruction of your Theme developer.
Theme directory is located at:
Linux-based
your-opencart-install-directory/catalog/view/theme/Windows-based
your-opencart-install-directory\catalog\view\theme\
Now, inside the theme folder holds all the Themes, and this includes the Default Theme. When installing a Theme, make sure that you create a folder inside the theme and name it accordingly. Then copy/upload all your theme files to that folder. But usually, your purchased theme already has this folder structure and what you only need is to upload all the files you see inside the upload folder, to your OpenCart install directory.
OpenCart Theme files and structure depends how complicated they are. Sometimes they require you to have the Default theme first, some requires uploading a number of files to; admin, catalog, image, system folder.
But when you purchased a ready-to-use Theme, all these hassles were already taken care of. All you need is to upload or copy files and folders you see inside the upload folder of your OpenCart instance. When copying or uploading the files, you need to overwrite all. That’s the general idea of installing a theme.
Some Theme requires you to just upload a whole folder inside catalog/view/theme folder, while some require to upload and overwrite the files in your OpenCart install directory. Better read the quick start manual for specific instruction.
Note 1: When buying a Theme, make sure to check version compatibility with your OpenCart instance. See to it that the Theme supports your current version.
Note 2: If you’re just starting out with OpenCart, it is better of using the Quick Start file for a quicker install of OC and your theme.
N-u-l-l-ed Themes
What is a n-u-l-l-e-d OpenCart Themes? – These are themes illegally distributed and offered as free downloads from known file-sharing and download sites. Usually these are popular themes with encoded license feature. But These types of themes will only work on the domain you have purchased license for.
Some smart4ss out there managed to decode them and make it work on any domain you would want.
Take note, though these are offered free, they carry modified files and malicious codes, which would cause damage in the end. So stay away from downloading these type of files. You may end up to a compromised or hacked servers, vps accounts, or hosting account, without you knowing it.
If you’re looking for a free OpenCart themes, just search for it from the official site instead. Searching is easy, just go to the extension page and use the filter block on the left.
You can use the Theme on any domain you would want, the only catch is, they might not look as awesome as you want.
Link:
https://www.opencart.com/index.php?route=extension/extension
Reference Image:

Screenshot – Searching for OpenCart Free Themes
How To Install On Localhost
If you have read my OpenCart Installation tutorial, one method I’ve discussed there is the “portabe web server” method. The method which involved using a WAMP stack called USBWebserver. It’s a localhost installation using Windows, and theme install process would not be difficult for newbies like myself.
The general idea is to copy all the necessary files to the target path, and in this case, an OpenCart instance on localhost. We don’t have to use SSH/SCP or FTP client with this, just plain old copy/paste.
Same thing even when using XAMPP server for Windows.
Procedure
Step 1: Extract the theme file and copy.
Step 2: Copy the files and paste.
Once extracted, look for the upload folder, and copy all the files.
Now, go to your OC install directory and paste the files there and overwrite all.
Step 3: Check your theme folder & make sure it was copied.
Make sure every files and folder from the upload directory were copied.
Check the Theme folder by going to:
catalog->view->themeand check the folders, make sure you have your theme folder there.Reference Image – in my case:

Everything there? Then go to step 4.
Step 4: Activate the theme
Login to Admin Dashboard.
Then go to:
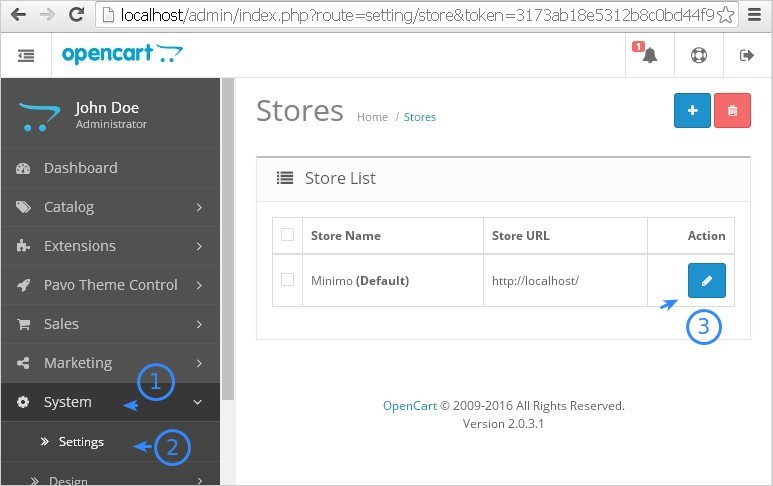
System->Settings->Store name-> click edit buttonReference Image:

Next:
Go to
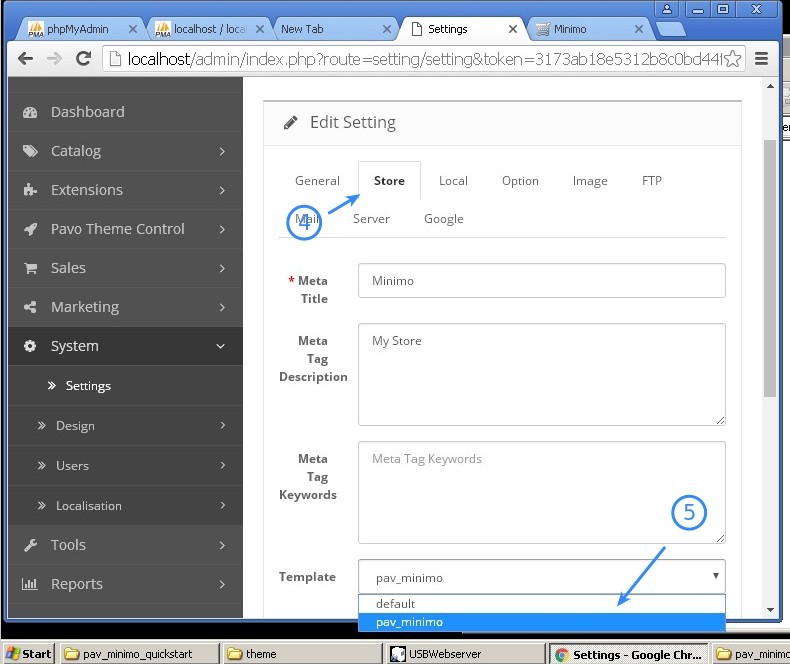
Storetab and scroll down a bit and click onTemplate. You should be able to find your template there. Select to activate it then Save your settings.Reference Image:

Done! Your theme may require additional configuration, and you may find the menu on the left block of the admin dashboard. Here is a sample from my theme.
Reference Image:


cPanel Based OpenCart
To install OpenCart Theme on cPanel enabled hosting environment, you will need a tool called FTP client. Such tool is FileZilla ftp client, which is available Windows and Linux machines.
Steps is similar to those mentioned above, the only thing different is the upload procedure.
To start off, download the client from this page.
Then do the following.
Procedure
Step 1: Extract your Theme file.
Step 2: Launch Filezilla.
Fire it up and fill out the necessary fields:
- Host
- Username
- Password
- Port – usually
21
For a quick and simple connection, just hit Quick Connect button to initiate connection. Once connected, navigate to your Theme files using the pane on the right.
Reference Image:

Step 3: Select theme files and upload
Highlight all the files/folders on the right pane.
Right click on it then click upload from the context menu. When finished, open a browser and navigate to your OpenCart Admin Dashboard (
http://yourdomain.tld/admin).Step 4: Activate your theme
Follow the same steps mentioned in this section, and that would be it.

Changing a Theme
To change a theme, you simply need to upload all the required theme files. Again, you need to copy/upload all the files and overwrite any files in your OpenCart install directory. Every theme developer has different install instruction, so better read their quick start guideline.
Changing a theme would only require to upload the file and activate it from the Admin Dashboard, as mentioned in this step.
Using The Quick Start Files
Now what is a Quick Start Files?
This is a set of files that came with your Theme. It’s supposed to help you quickstart OpenCart by enabling you to install OC along with the Theme and also will install additional configurations, layout settings, category and product data. Hassle free right?
You don’t need to install OC first, then setup the Theme after. With the quickstart files, it does both at the same time. Plus, you even get the sample data with this process, you will be able to see your site setup like the Theme’s demo.
Take note of this though, the Theme only support the OC version that came with the file. You might wanna check the download section for your theme for the latest OC support. In addition, only use this if you’re starting from fresh and not on any instance where live data are being used.
Reference Image:

It’s a Wrap!
This is the basic how-to guide on installing an OpenCart theme on localhost. your purchased theme might have special instruction, so make sure you read the manual. If you’re stuck on something, feel free to ask it here and I will try to help whenever I could. But in case of issues, you should first contact your theme developer and submit a ticket using their helpdesk ticketing system