UPDATED: 08-22-2017 – Here is the ultimate answer to your question on how to install Remix OS. I came up with various methods of installing this beautiful Linux-kernel based Operating System. This includes methods from the official site, along with other methods that some folks aren’t covering yet. You need to be a little tech savvy to follow on with this guide.
Most tutorials out there, either written or video guide, usually covers the official and usual way of installing Remix OS on a Desktop PC. But with my post today, I’ll be covering different methods of Remix OS installation. This includes; direct hard drive installation, USB, VirtualBox, Dual-boot or Stand-alone type of installation.
So if you really want to learn how you would do this, you need to be patient and should read this guide word-for-word to fully understand and install Remix OS successfully. I highly recommend that you follow the same setup or environment as what I’ve used in this particular post.
Jump Links
- What is Remix OS
- Remix OS Installation Methods
- Official Method
- Direct Hard Drive, Primary OS or Stand-alone
- VirtualBox Method
- Native Dual-boot with Linux (Ubuntu/Linuxmint) or Windows: Will write the guide soon
- Video Reference
Remix OS Installation Requirements
- At least 8GB USB Flash Drive for USB Installation
- At least 32GB of Hard Drive Space for Windows-based Installation
- At least 2pc USB Flash Drives (when no CD/DVD ROM Drive to use), for Single-boot Installation
- A dedicated HDD for Remix OS single-boot installation.
- Hiren’s Boot CD or any partition tool you would want.
What is Remix OS
Remix OS – is an Android™ OS for Desktop PCs, that support Legacy BIOS and UEFI boot methods. You can also run the OS on ARM devices. As of Saturday, 03 December, 2016 – Remix OS with Version 3.0.207 is now powered by Android™ Marshmallow.
With this Operating System, you can run any of your favorite Android Apps right on your PC. You don’t need to install another software or emulator just to run your most loved Android apps.
Game or productivity apps, you name it, it can run on your Desktop. No need for that sluggish and bloated software like BlueStacks – sorry no offense, but this is how I felt for this software.
FYI, BlueStacks is an Android emulator for PC.
This OS was created by Jide Technology – a company founded by three ex-Google engineers, to fulfill the goal of unlatching Android’s potential in this era of computing. Later, the Jide team was joined by Android-x86 founder, Chih-Wei Huang as x86 Technology Lead. In case you didn’t know yet, the Android x86 project is an Open Source project that ports the Android OS to Desktop PCs. That said, Chih-Wei Huang should play a vital role in the further development of Remix OS.
Why You’d Want To Use This OS?
Well I’m not saying this for everyone, but I should say that Remix OS is fast and efficient. I don’t have the numbers or benchmark score, but I can say that this OS is fast. You can install it on an old PC laying around and still you can feel the difference compared to Windows.
I’ve tested this on a Virtual Machine with 1GB of memory, and still this OS was responsive. Except when I launched several Apps at the same time, it becomes sluggish and almost hung up. Of course that is due to memory starvation. But what I’m trying to prove is, the interface itself is very responsive. I’m on a Linuxmint machine that I use everyday, and I usually notice a slight delay when launching Chrome, my file manager Nemo and some other Apps that I use everyday.
Also, why you wanna use this is because of Google Play. I mean come on… Android has thousands of FREE Apps at your disposal, and you can use and download these in Remix OS. Fan of COC? Well you can perfectly run this Android game on your PC, bigger screen!
And if you compare Remix OS against other alternatives out there (Android-enabled devices or softwares), still it beats the crap out of them. See image below to show how fast Remix OS run, on an Intel i5 processor.
The screenshot above shows the speed gaps between BlueStack 2 on i5, Samsung Galaxy Note 5 and other devices, which can obviously seen on the photo. The photo by the way is a screengrab from Remix OS‘ website.
My second consideration is ease of installation and use. Unlike Windows, you can use this OS right after you have installed it. You don’t need to install additional drivers or softwares just to tell that it is operational.
If you need additional apps, just launch the Chrome browser and search for the app you would want. Or use the Google Play menu, like you always do on your Mobile, to search for your favorite apps.
Another consideration why I would want to use this, is because it’s FREE. Yes, it is! Unlike Windows (comparing free vs paid), that you got to have a license for it to be installed. Not unless you’re a pirate and fond of using pirated copy of this OS along with malware/spyware installed with it. Take note though, that some Apps are not free. Especially those premium Apps and Apps with “In-App Purchase” feature.
You could actually use this OS in an enterprise environment like; Call Centers, Offices or Educational Institutions. You can set this up on a cheap ARM devices and mount it behind a LCD screen. Have you seed one of those setup? I like to setup one, but don’t have the right budget for it.
Now, here comes the nitty-gritty part of this post. Check further below.
Official Method of Installing Remix OS
I know this method has been covered several times already and posted all over the Internet.
But for the sake of this tutorial, I’m going to cover this and should be explained step-by-step to help my fellow noobs out there.
Noobs, be proud and follow this guide.
Note: Official method lets you place Remix OS on your hard disk as a Dual-boot with Windows 7, Windows 8 or Windows 10 and on a USB 3.0 Flash Drive.
Jide Technology recommends USB 3.0 for better performance. USB 3.0 performs faster than USB 2.0 in terms of transfer speed (640MBps).
I was able to run Remix on a 32GB and 8GB without issues. Only thing is, it takes a while for the first boot (15-20 minutes).
For Hard Disk Installation – Windows Based
The current installer tool supports Windows 7, Windows 8 or Windows 10, no Mac or Linux support yet. You need to have at least 8GB of hard drive space.
Note: You really don’t have to create a separate partition or dedicated hard drive for this install method. Why so? Because Remix will just copy the image file to a folder in your Windows
C:drive, along with the necessary files on the other parts of the drive. Fairly simple to install. You can easily remove/uninstall it later when you need to.
Installation Overview
Download the zipped package for Remix OS. This includes the Remix OS ISO file and the
.exeInstall Tool.Sample file names:
Remix_OS_for_PC_Android_M_64bit_B2016112101.isoRemix_OS_for_PC_Installation_Tool-B2016080802.exe
Run the
exeinstaller tool and follow the instructions to install Remix OS on your PC’s hard drive.Reboot your PC.
For UEFI, press special key (F12 for Dell, F9 for HP, F12 for Lenovo, Option Key for MAC) while booting to enter boot menu and ensure that Secure Boot is disabled.
Select Remix OS from the Windows Boot Menu – Installation should continue in the background.
The Step-by-step Guide
Here comes the action.
Step 1: Download and Extract Remix OS
Download the package from this page and extract somewhere convenient on your hard drive.
You should see several files after extracting the zip file. In my case, I’ve got these:
How_to_launch_Remix_OS_for_PC.txtmd5sum.txtRemix_OS_for_PC_Android_M_64bit_B2016112101.isoRemix_OS_for_PC_Installation_Tool-B2016080802.exe
Note: You should have disabled
Hide extension for known file typesin Folder Options menu, under Windows OS.
Step 2: Launch the Installer
Run the exe installer tool and follow the instructions to install Remix OS on your PC’s hard drive.
You could right-click on the .exe file and choose Run as administrator or simply double-click the file to run it, then choose Yes on the next pop-up dialog.
You should now see the Install Wizard window, you should browse to the Remix OS ISO file, and choose Hard Disk for Type. Target drive could be C: (yes folks!) or another unused partition on your hard drive.
If you wonder why install Remix OS on
C:drive? Well, with the installer tool, it is safe to install on the same partition as Windows sits on.Why so? Because Remix OS will create a folder for itself, for its exclusive use. It will not overwrite any of the Windows files nor wipe out your existing partition. Remix OS will create a virtual file system in the form of
data.imgfile. This file should contain your “Internal Storage” device – that appears as storage in Android devices. So it’s perfectly safe to use theC:drive, provided that you have enough space for Remix OS to use. You could use a32GB,16GBand8GBas storage device, the install should prompt you to choose one.Checkout how easy it is to remove/uninstall Remix OS, using this guide.
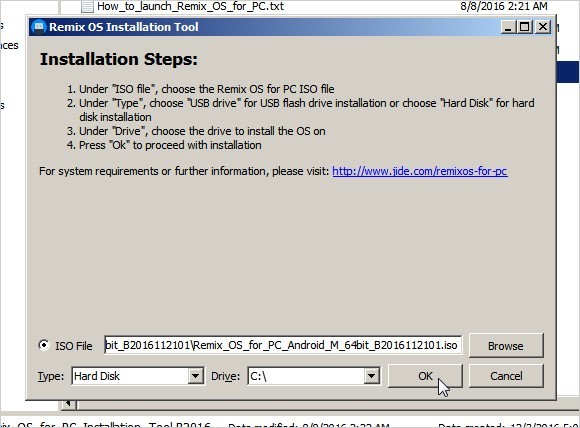
Screenshot – Remix OS Windows Installation
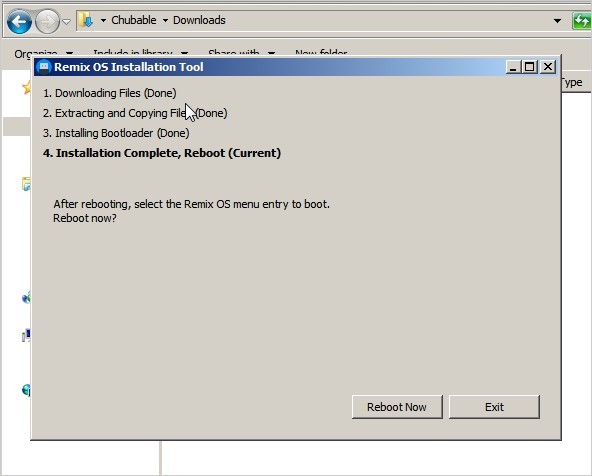
Click OK, and you should be able to choose your System Size, depending on your free hard disk space, you could choose from; 8, 16 or 32GB system size. If you have the sufficient space, choose 32GB – which is the recommended one.
Click OK again to start the install process. Once done, the Wizard will prompt you to reboot.
Reference Image:
Screenshot – Remix OS Installed Alongside Windows
Note: You can actually choose
C:drive, it’s safe to do that, since Remix OS will copy the files to a directory nameRemixOS.
Step 3: Reboot your PC.
For UEFI, press special key (F12 for Dell, F9 for HP, F12 for Lenovo, Option Key for MAC) while booting to enter boot menu and ensure that Secure Boot is disabled.
Once you get pass the POST section of the boot sequence, you should get a Windows Boot Manager menu looking like this:
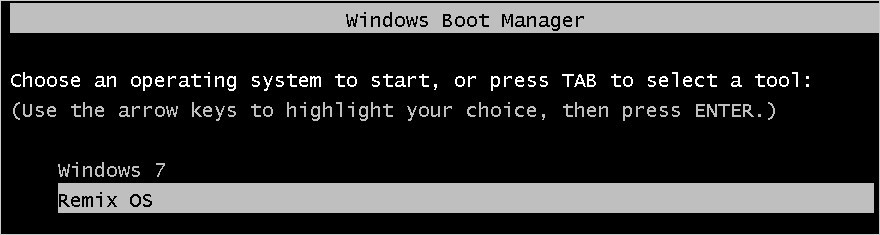
Screenshot – Windows Boot Manager
Step 4: Now select Remix OS and hit ENTER key.
You should now see the boot logo with black background and white text. This might take a while, but once you get pass this screen, you should be prompted to select your preferred language. See image below.

Screenshot – Remix OS Language Selection Screen
Follow the rest of the prompt; agree to to User Agreement, Setup WiFi (or Skip this), add some of your favorite apps, then agree to Activate Google Play.
And that would be it! You should now installed Remix OS alongside Windows as a dual-boot system.
Very simple process and not too challenging, right? Right!
But what if you want to use Remix OS as your core OS, leaving you the question…
How to install Remix OS as my primary or standalone OS?
Well, you’re just in luck! Because the guide is actually included in this post. Read on.
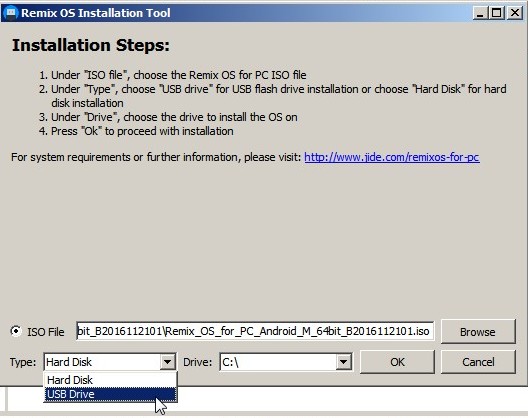
For USB Installation – Windows Based
To install Remix OS on a USB Drive, simply follow the steps mentioned above. Simply select USB drive as your Disk Type, then select the drive letter for the USB.
See reference image below.
Uninstall or Remove Remix OS
I’m sure most folks out there will ask this same question after trying out Remix OS on their Windows machine.
How to uninstall/remove Remix OS?
To remove Remix OS from your system, simply run the UninstallRemixOS file from C:\RemixOS\ folder. It should delete the files and the entry from the Windows Boot Manager.
Then delete the data.img file, along with the .disk folder. This should free up the space consumed by the OS.
Reboot your PC and done!
Single-boot or Standalone Installation
Actually this is not an official guide for installing Remix OS to hard drive without Windows. Jide Technology recommends to use the installer version, which let you install ROS alongside Windows 7, 8, or 10. But if you want to follow on, then let’s get started.
This is for a single-boot only install method. You need to use the .iso file that came with the downloaded .zip file.
Single Boot Requirements
- You need a separate HDD – or better of, another set of PC.
- You also need a 3rd-party partitioning software – This doesn’t need to be a paid or commercial one. You can download free tools like Hiren’s Boot CD. It’s a live CD ISO which you can use to partition/format your hard disk in preparation for the OS installation. You could use similar tools if you want.
Burned ISO for Remix OS 3.0 64-bit – Build No.
B2016112101– or you can use the most recent one. But for the sake of this guide and to avoid issues, please use this build. Burning the ISO to a physical CD is beyond the scope of this guide.USB Drive if you don’t have a CD Burner. Use Rufus to write the ISO to USB.
PC with Legacy BIOS – yes, I am still using this. For UEFI users, I am not sure if this guide would work for you.
Note (Added on 08-22-2017): I’ve tested the 64-bit Package
version 3.0.207on my Legacy BIOS enabled system, powered by AMD Sempron, and it did not worked out of the box. I got the Remix OS Black Screen Issue. The 64-bit version is supposed to work on systems using legacy BIOS to boot their OS, but in my specific case, it didn’t. On a side note, perhaps you should use the 32-bit package strictly for older systems using legacy BIOS, to avoid installation and boot issues.
Install Overview
Quick info on how to install ROS, NOT dual-boot. Take note, I tested the latest build version 3.0.207 (as of August 22, 2017), and all worked fine using this guide.
Note: To avoid headaches, installation and boot issues on older systems using Legacy BIOS boot, use the 32-bit package.
- Boot from Hiren’s Boot CD, then choose the
Parted Magic. - Launch GParted and create a new Partition Table (will wipe the disk out), then create a new
ext4partition, using all available space. Save/Apply and Reboot. - Boot from Remix OS ISO, set boot flag to
INSTALL=1 Installation
- Choose your target drive (prepped in Step 2 above)
- Choose “Do Not Format”.
- Choose to “install Grub Boot Loader”.
- Choose if you want to enable read/write for
/systemfolder - Installation should now take place.
- Reboot
- Glowing Remix OS Boot Logo should appear. This should take a while, around 15-minutes in my single-drive setup.
First Boot and Setup
- Welcome Screen
- Select your language
- User agreement
- Wifi setup
- Recommended App install
- Activate Google Play™
- Done!
Also Read: Endless OS Installation – It’s another Linux-based OS
The Step-by-step Procedure
In case you no longer use CD/DVD Drives, then you must have 2 USB drives. One for Hiren’s BootCD (1GB at least) and another for Remix OS (at least 2GB).
Step 1: Boot from Hiren’s Boot CD, then choose the
Parted Magic.You can use similar tools, but for this guide I’d be using Hiren’s Boot CD, because it has all the features I need, not only useful with this setup.
Download, extract and burn the
.isofile to a CD, or use Rufus to write the file to a USB Drive and boot from it.Note: Download link is at the bottom of Hiren’s Download page.
I’ll be using Parted Magic, which is included in the live cd. It has GParted and Clonezilla with it. It is basically a Linux with Desktop environment, so you can use it with a graphical interface and also includes a terminal.
So boot from the CD or USB, then choose “Parted Magic”.
Step 2: Launch GParted and create a new Partition Table (will wipe the disk out), then create a new
ext4partition, using all available space. Save/Apply and Reboot.In case you still have your old partitions, you can simply remove/delete all those by creating a new Partition Table. Set the type to
msdosand it should wipe all the partitions out. I’ve tried and testedGPTbut it didn’t work in my case (legacy BIOS boot).Then right-click on the gray unallocated area and choose to create a new EXT4 partition. See video.
Once done, apply and save. Logout and shutdown your PC.
Turn it on again and switch to the Remix ISO Installer, then follow below step.
Step 3: Boot from Remix OS ISO, set boot flag to
INSTALL=1Once Grub Boot Menu shows up, press
ewhile Resident Mode is high-lighted. This should enable you to edit the boot flags.Notice that
SRC= DATA= CREATE_DATA_IMG=1text?Change that to
SRC= DATA= INSTALL=1and hit ENTER key.Install wizard screen (with blue background) should appear, now follow next steps below.
Step 4: Installation – Choose options
- Choose your target drive (prepped in Step 2 above), usually it’s
sda1– for single partition drive with no other disks attached. - Choose “Do Not Format”.
- Choose to “install Grub Boot Loader” – don’t be misled by old tutorials and out-dated guides out there. Remix OS 3.0 perfectly installs Grub without issues, using the ISO method.
Choose if you want to enable read/write for
/systemfolder – in my case I chose NOT to speed up the process.Hit ENTER key and installation should now take place.
Eject the ROS installer, then Reboot.
Glowing Remix OS Boot Logo with black background should appear. This should take a while, around 15-minutes in my single-drive setup.d. After this, it should take you to the welcome screen. You are nearly there!
- Choose your target drive (prepped in Step 2 above), usually it’s
Step 5: First Boot and Setup – finally, set the following:
- Select your language
- User agreement
- WiFi setup
- Recommended App install – you’ll get this screen when your system is connected to the Internet.
- Activate Google Play™
Done!
Note: One more thing that you need to set. When you check on
Settings>Storage & USB>Portable storage, you’ll notice a “Corrupted Disk Error”. This is probably a bug, since it showed up on my several test setups (VirtualBox, USB, Windows, Single-boot, EXT4/NTFS).Be Warned!!! – you should not take the Setup process because it will destroy your current instance. It will mess up your partition.
What you should do is to turn-off the “auto mounting” feature, which is an experimental feature. Do do this, go to…
Settings>Experimental Features>Enable disk partition mount…and switch it OFF! Then restart your system. The next time you check that menu, it would be gone.
Reference Image:

Screenshot – Remix OS Corrupted Disk Warning
I think this method is not that difficult right? You could also try doing this on a VirtualBox. It’s more safe and quicker when just trying out the OS. Isn’t this a good idea?
Well, sure! But you might ask… How do I install Remix OS on a VirtualBox? — It is much simpler than you might imagine, see details below.

Remix OS Virtual Box Installation
To install ROS on a Virtual Machine, you need VirtualBox or similar software, the ISO image and my favorite tool Hiren’s Boot CD. You could use your own tool. The general idea of this is to use a third-party partitioning tool to prep your hard disk drive.
If you read the hard disk single-boot method, then this guide would be easier for you to follow.
Procedures
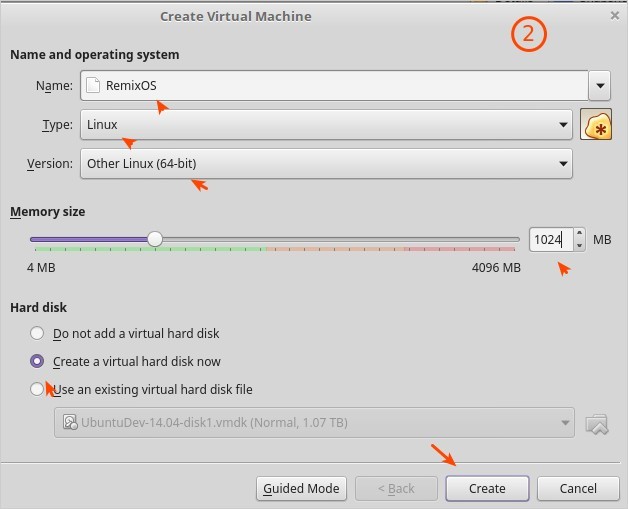
Step 1: Create a new VM.
Launch VirtualBox and click New, then fill out the following details:
- Name
- Type
- Version
- Memory Size
- Hard disk
If you would use the 64-bit version of Remix OS, then choose
Other Linux (64-bit)from Version field.Minimum Memory Size should be 1024 MB, you could adjust as you wish, just make sure it’s not more than half of your total system RAM.
Click Create, then proceed to step two below.
Reference Image:

VirtualBox Remix OS Installation

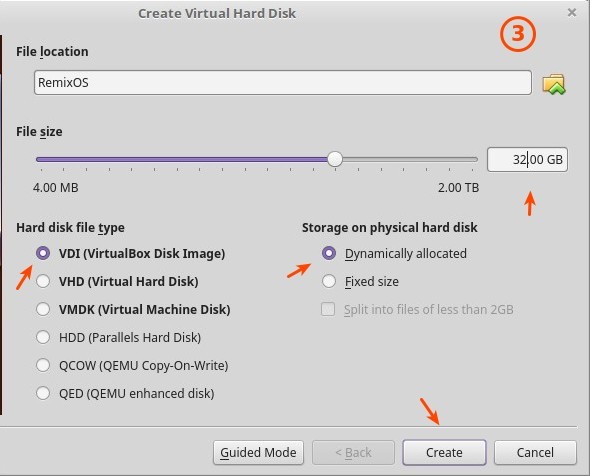
Step 2: Create the Virtual Hard Drive
Depending on your free space, you could create any virtual hdd you would want. If you have a dedicated partition or hdd just for VirtualBox to use, then you might want to use the full space available, leaving a little space for buffer. In my case, I chose to use 32GB Dynamically allocated VDI, because it’s quicker to make than with Fixed Sized VDI.
Note: Fixed Sized VDI will allocate and consume your hdd space though the disk would still be empty. So if you will create a 16GB VDI, it will show as 16GB file when you check its properties. While for dynamically allocated hard drive would not. It’ll grow when you start putting file into the drive.
Reference Image:

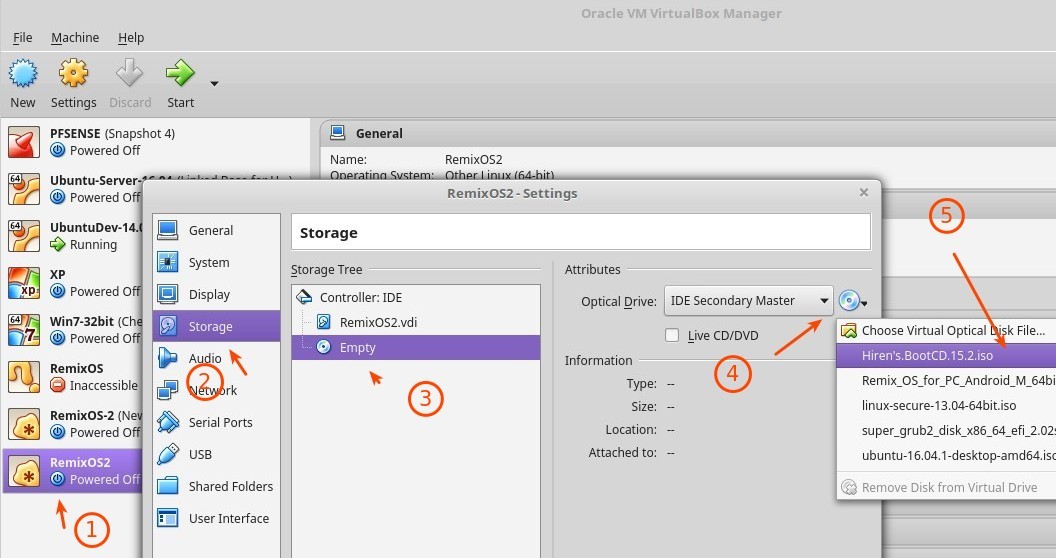
Step 3: Configure VirtualBox and attach the Remix ISO, then boot from it.
Click on the newly created VM and hit
ctrl + sto launch the settings window. You could also access the page by right-clicking and then Settings.Go to
System>Processortab and selectEnable PAE/NX.Next, go to
Accelrationtab and make sureEnable VT-x/AMD-Vis tick/enabled. Click OK to save.Reference Image:

VirtualBox Settings for Remix OS
Next, mount HBD ISO:
Choose Storage, then click on the cd icon below your virtual drive, it should appear as empty. Then on the far right corner of the page, click on the drop-down with cd icon or with the label “optical drive”. Choose Hiren’s Boot CD and click OK. Now you’re ready to start the VM.
Reference Image:

Step 4: Start the Remix VM and follow the single-boot method above.
Reference Image:

Starting the Remix OS VM


Answers To Common Issues
Why would I install on
C:drive, would it not mess my Windows partition?Answer: No, it wouldn’t. Because Remix OS 3.0 would just copy the files on the
C:drive inside a folder of it’s own. It will use a file calleddata.imgas its Internal Storage. Treat it like a container for your files. For the newbies, thatdata.imgfile is your hdd when using Remix with Windows.Can I resize the data.img file larger than 32GB?
Answer: Yes, of course. You need another tool for that, and you can use one for Windows or Linux. Guide on how you would increase the data.img size is not yet posted though. But I will soon write the guide for it.
Why first time boot takes long?
Answer: That’s pretty normal especially when using USB 2.0. It can be faster when using USB 3.0, or SSD Drives using Windows or Standalone Method. Another reason is because of
data.imgcreation. I won’t discuss the details, but what’s actually happening behind that boot screen logo is… ROS is actually creating the filedata.img, then formats it to a usable format (ext4), then lays out the necessary directories like; Photos, Documents and etc. Also, time it takes depends on your chosen system storage during the installation (8GB, 16GB, 32GB).Can I just copy the “data.img” file from someone or somewhere else?
Answer: Yes you could. Just slap in the
data.imgfile inside the Remix OS folder and boot up. Make sure you do this right after the installation, before you make a reboot. Though, this might lead to security issues – when you copied or downloaded it from the Internet. You won’t know that files might be included in that image.My PC hung up during the first boot, any solutions?
Answer: If you follow the Windows method, the installation might have been incomplete. You need to login to Windows again, uninstall and reinstall. Make sure to watch the window for errors or notices. Make sure that that you have an
unformatted_data.imgfile before you reboot. If this still fails, edit the boot flags underResident Modeand set flags toDATA= SRC=/RemixOS CREATE_DATA_IMG=1, hit ENTER thenbonce you get back to the previous screen. It should boot ok and create the image file, which should take a while.I created a USB installer and used it to install Remix directly to my HDD – but grub won’t boot?
Answer: I’ve tested this several times on different methods, the USB installer won’t install Grub perfectly. Using the ISO method works fine. Some old posts out there tells you to NOT install Grub and skip it, then install later, which will make life difficult for newbies. Well, in Remix OS 3.0 you don’t have to do that. Just use the ISO, it should work.
I only have a single partition on my Windows machine, can I create a separate partition for Remix OS to use?
Answer: Yes you can! Use any partitioning tools like GParted, it’s included in; the Hiren’s Boot CD, Linuxmint, Ubuntu Desktop Live CDs. You can use other tool like Easus Partition Manager. Gparted can be accessed via Once you made a new partition, format it to NTFS and mount it in Windows.
It’s a Wrap!
If you follow this guide very carefully, you should have installed Remix OS successfully. But if you ran through issues and got stuck with something, feel free to ask below and I’d be glad to answer when I have the time.
And if this guide worked for you, then pat yourself on the back. You have followed carefully. Please share to others too, okay?
One thing… I’ve gone through several old posts which are no longer relevant to Remix OS 3.0. So I wrote this tutorial (my first ever post in 2017) for future readers. Some guides out there only works with the old version, some points to v2.0 and beta versions of Remix. So if you came across one, you may point/link to this post.