Since the time I’ve posted the Unicenta 3.8 Installation guide, it’s been long that I haven’t updated the post. It took me almost two years to update the guide, due to busy schedules. Well, now I got the opportunity to write the guide for this open source point of sale system called Unicenta POS 3.91.
Jump Links
- Things Needed for the Linux POS Setup
- Procedures
- Installing Unicenta Using GUI
- Solution for Desktop Shortcut Not Working
- Video Guide
Also Read:
– Things you need to know when building your own POS System.
– Installing uniCenta 4.x.x on Linuxmint 19
If you’re looking to build your own Linux POS System, then follow this Ubuntu 16.04 guide to get you started. You don’t need the latest in PC Hardware, all you need is any computer with at least 512MB of memory. You could use those old Pentium IV based PCs and just throw in some RAM, maybe two sticks of 256MB or single stick of 512MB Ram, then load up Ubuntu and voila! You could now setup your own free POS system, that is based on Linux.
Before you start with the guide, I require you to install Ubuntu 16.04 Desktop version first. You can either use a physical machine or a Virtual Machine, it’s your choice. But of course, you have to use physical machine for your production environment.
There’s one thing I need you to take note of, I’m not an expert in this field, but I tell you what, I have real-world experiences setting up this kind of thing professionally in a production environment. And guess what? I just learned all this by myself. Yes, that’s a fact!
Everything can be learned, so be patient and follow through this guide step-by-step.
Step-by-step Guide on Installing Unicenta 3.91 on Ubuntu 16.04 Desktop
Using Ubuntu 16.04 with Unicenta requires a bit of Linux terminal knowledge. You need to understand some of the commands used in this guide, you could lookup Google for this command if you wanted to learn more about it.
The following commands will be used in this guide:
cp– the copy commandmv– move file/directory commandchmod– set file/folder permissionnano– to launch the nano text editor
Things Needed for the Linux POS Setup
- Ubuntu Desktop 16.04 (32 or 64-bit), 64-bit shall be use for this guide.
- Unicenta POS 3.91.x.
- VirtualBox or VMWare for the virtual machine, only if you wanted to use a guest machine to load up Ubuntu Desktop.
- Java JRE – for your specific Ubuntu architecture (32/64-bit).
Procedures
I like to mention again in this section that I’ll be using Ubuntu Desktop 16.04 64-bit version and Unicenta 3.91.3. So, to easily follow on this guide, I highly recommend that you should use the same version and architecture. Once you learned how to do this, then you could choose to use any version you want. In addition to this, using the same setup as mine, will let you copy/paste the command or copy part of it and make necessary adjustment.
Also take note of this YouTube video link that you could use as visual reference along with this guide.
Step 1: Launch Ubuntu & Download Unicenta
Fire up Ubuntu Desktop 16.04 and download the latest version of Unicenta POS. At the time of writing this guide, version 3.91.3 is the latest.
Note: For some reason unknown yet to me, creating a launcher or desktop shortcut for
start.shis not working. I haven’t dig further due to lack of time, but I managed to make a work-around. If you have read my Unicenta 3.8 installation guide, creating a Desktop Launcher is very easy and flawless.
Step 2: Download Java JRE and Install
As of September 30, 2016, the latest version of Java Runtime Environment is 8u101 – which in this case, will be used.
Download Java JRE – for your specific Ubuntu architecture (32/64-bit). But in this case, I’m gonna be using
jre-8u101-linux-x64.tar.gz.Reference Image:

When using Firefox in Ubuntu, the default download location for files is in
/home/your-user-name/Downloads. To quickly access this location using terminal is by invoking this command:cd ~/Downloadsthen type inls -lto list your downloaded items.jre-8u101-linux-x64.tar.gzshould be listed.Extract
jre-8u101-linux-x64.tar.gzFrom commandline, type:
tar zxvf jre-8u101-linux-x64.tar.gzIf you do this while on Downloads directory, then the extracted files is in that directory.
In this case, the extracted directory is named
jre1.8.0_101Reference Image:

Screenshot – Java JRE Extracted
To install
Move
jre1.8.0_101to/opt/directory.sudo mv jre1.8.0_101/ /opt/To verify, type:
ls /opt/You should see
jre1.8.0_101listed there.Then type:
sudo update-alternatives --install /usr/bin/java java /opt/jre1.8.0_101/bin/java 110Sample output (actual screen output in this case):
update-alternatives: using /opt/jre1.8.0_101/bin/java to provide /usr/bin/java (java) in auto modeNext, type:
sudo update-alternatives --config javaIf only single version of JRE is installed, then the expected output is:
 There is only one alternative in link group java (providing /usr/bin/java):
 /opt/jre1.8.0_101/bin/java
 Nothing to configure.
Otherwise, a prompt will ask what version to use.
Set environment so users can use your configured Java JRE location
sudo nano /etc/environmentThe above command will bring up Nano Text Editor and will allow you to edit
/etc/environmentfile.Expected screen output should be:
PATH="/usr/local/sbin:/usr/local/bin:/usr/sbin:/usr/bin:/sbin:/bin:/usr/games:/usr/local/games"Now, below that text, enter:
JAVA_HOME="/opt/jre1.8.0_101"So it will look like this:
PATH="/usr/local/sbin:/usr/local/bin:/usr/sbin:/usr/bin:/sbin:/bin:/usr/games:/usr/local/games"
JAVA_HOME="/opt/jre1.8.0_101"
Then type
ctrl + othenenterkey to save.ctrl + xto exit the text editor.Next, type:
source /etc/environmentNo text output will appear, but to verify, type:
echo $JAVA_HOMEExpected output in this case is:
/opt/jre1.8.0_101If you see the above output, then that’s great! You have successfully installed Java JRE for Unicenta 3.9. Next step is to reboot your system. Just type
sudo rebootfrom commandline, to quickly do a reboot.Once rebooted, proceed to Unicenta 3.91 installation steps below.


Step 3: Download and Install Unicenta POS 3.91.x
If you don’t have it yet, download Unicenta POS 3.91.x to your preferred location inside your Ubuntu file system.
Using Firefox under Ubuntu 16.04, by default, is configured to download all files in /home/your-user-name/Downloads. So check this directory for the downloaded files. Unlike Unicenta POS 3.8 which came in an archived format (zip), version 3.91.x is a .run file.
In this case, my downloaded file name is: unicentaopos-3.91.3-linux-x64-installer.run
Now, before you can run or execute the file, you must first set the file permission to executable. For this, you can either use the commandline or the GUI, when installing Unicenta 3.91.
Note: This guide on Unicenta 3.91 installation or setup under Ubuntu will also work under Linuxmint
3.1. Using the commandline is like so, open terminal do the following:
change directory to Downloads directory or your chosen download location, in this case, I typed;
cd ~/Downloadsandls. After invoking this command, you should see the fileunicentaopos-3.91.3-linux-x64-installer.run, with white colored text – this file name may not be the case in the future.Then set execute permission:
chmod a+x unicentaopos-3.91.3-linux-x64-installer.runTo verify, type:
lswhile still in the Downloads directory, you should notice that the text color is now green.OR if you type
ls -l, you’ll see that file permission have been set to executable by observing thex– which means executable by file OWNER-GROUP-OTHERS, i.e x-x-xSample output:
-rwxrwxr-x 1 chubbable chubbable 99352965 Sep 30 19:28 unicentaopos-3.91.3-linux-x64-installer.runExecute the Installer File
While still in
Downloadsdirectory, run the installer fileunicentaopos-3.91.3-linux-x64-installer.run, and when asked where it should be installed, choose the/optdirectory.To run/execute the installer, do the following:
sudo ./unicentaopos-3.91.3-linux-x64-installer.run --mode textYou’ll then be asked to choose the language you wanted Unicenta to use. The default selected option is
English, which is13from the selection menu. This is by default selected, you just need to pressenterkey here if you’re going to useEnglish. Else, enter the number specified for the language you wanted to use.Sample output:
...

[41] Traditional Chinese - 繁体中文
[42] Turkish - Türkçe
[43] Turkmen - Türkmençe
[44] Valencian - Valencià
[45] Vietnamese - Tiếng Việt
[46] Welsh - Cymraeg
Please choose an option [13] :
Next, you’ll be asked to choose which JVM to use, sample output in my case:
Please choose an option [13] :
JVM Selection

Please select the Java(tm) Runtime to use
[1] Oracle/Sun 1.8.0 64-bit /usr/bin/java
[2] Oracle/Sun 1.8.0 64-bit /opt/jre1.8.0_101/bin/java
Please choose an option [1] :
In my case, I’d choose
2, so I typed2and press theenterkey to proceed.Next prompt would be:
Welcome to the uniCenta oPOS Setup Wizard.Please read the following License Agreement. You must accept the terms of this agreement before continuing with the installation.
Press [Enter] to continue:
To accept the LA, just hit enter key several times until it prompts you to:
Do you accept this license? [y/n]:Press
yand enter.Next prompt would be the installation location:
Please specify the directory where uniCenta oPOS will be installed.

Installation Directory [/opt/unicentaopos-3.91.3]
Press
Enterkey to accept and use the suggested location, which is[/opt/unicentaopos-3.91.3in this case. When asked of “Do you want to continue”, of course you would say yes, so hitykey and enter.Setup will take a breeze, see sample output below:
Reference Image:

Screenshot – Unicenta Installation using Ubuntu Commandline
Running ang Testing Unicenta 3.91
While still in commandline, navigate to
/opt/unicentaopos-3.91.3directory. This is where we installed Unicenta during the commanline-based installation. To go to this location, type:cd /opt/unicentaopos-3.91.3then typels -l. You should see files like; start.sh, configure.sh and migrate.sh. You need to set file permission for these files, and you should dochmod a+x *.shfor this.Once done, you should now be able to execute/run Unicenta 3.91 on Ubuntu 16.04.
To run/execute, just type
./start.sh.NOTE: It may take a while for the first run, so be patient and wait for the splash screen to show. But you must answer and click
Yesfor the first prompt.When you see the screen like the one blow, then congratulations! You did it!
Reference Image:

Screenshot – Unicenta 3.9 Successfully Installed in Ubuntu 16.04


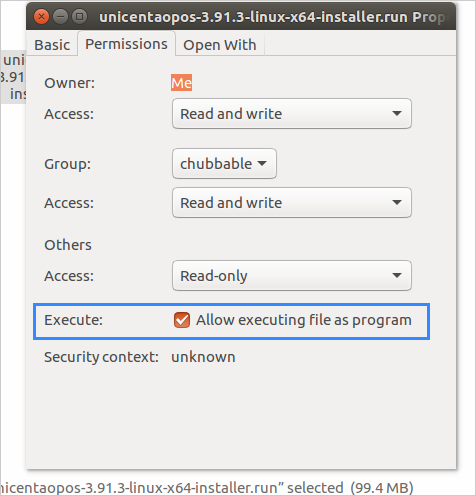
3.2. Using the File Manager:
Using the File Manager, navigate to
Downloadsfolder (in this case), then right click on the file. Then chooseProperties, thenPermissions. Tick the check box labeledAllow executing file as program, and close the dialog box.Reference Image:

Screenshot – Set Permission for Unicenta Installer
Next run/execute the installer file.
You could double click or right-click then choose RUN.
It may take a while to open during the first time, so please be patient and wait for dialogue box or pop-up window. Choose language, JVM path, accept license agreement, and installation directory and follow on. When using the GUI/File Manager to install Unicenta 3.9, the default selected location is your Home Directory. That is –
/home/your-user-name/unicentaopos-3.91.3. I recommend that you choose the/optlocation for multi-user/multi-login setup.
Step 4: Create Launcher for Unicenta 3.91 in Ubuntu 16.04
The old and known way of creating a launcher, under Linux, no longer works this time. I wasn’t able yet to search on this, why the launcher doesn’t work. Launcher creation for older Unicenta version was mentioned in this post. Jump to Linux based installation section.
Creating the launcher in this version of Unicenta, and as a work-around, involves additional step to what was mentioned in my older post. This time, you need to create a simple .sh file inside the Unicenta 3.91 installation directory. Then make reference to this file when creating the Desktop Launcher.
Procedure – Using Commandline
Open Terminal and type:
nano ~/Desktop/Unicenta.desktopCopy/paste the following:
[Desktop Entry]
Encoding=UTF-8
Version=1.0
Name=Unicenta
Comment=Fires up Unicenta oPOS
Type=Application
Exec=/opt/unicentaopos-3.91.3/launcher.sh
Icon=/opt/unicentaopos-3.91.3/unicentaopos.ico
Save the file:
ctlr + oand press enter key, then exit the editor,ctrl + x.Set file permission:
chmod a+x ~/Desktop/Unicenta.desktopIf you’re following the whole guide, you observed that
/opt/unicentaopos-3.91.3is the installation directory. If you came to this part from Search Engine, then make the necessary adjustment to path.Solution for Desktop Shortcut Not Working
Open a terminal then type:
sudo nano /opt/unicentaopos-3.91.3/launcher.sh.Then copy/paste the following:
  #!/bin/bash
  cd /opt/unicentaopos-3.91.3
  ./start.sh
Save the file and exit the editor.
Set file permission
sudo chmod a+x /opt/unicentaopos-3.91.3/launcher.shTest the Unicenta 3.91 Launcher, by double clicking on it, or right-click then open. Take note, that it may take a while to start when it’s first time to launch.
Procedure – Using GUI
Create the
Unicenta.desktopfile by right-clicking on the Desktop, then chooseNew Document, thenEmpty Document. Make sure you name the file with.desktopextension. Then double click on it to launch the text editor.Copy/paste and save
[Desktop Entry]
Encoding=UTF-8
Version=1.0
Name=Unicenta
Comment=Fires up Unicenta oPOS
Type=Application
Exec=/opt/unicentaopos-3.91.3/launcher.sh
Icon=/opt/unicentaopos-3.91.3/unicentaopos.ico
Make the file executable – right-click on
Unicenta.desktopfile and chooseproperties, thenpermission, then tick the checkboxAllow executing file as program. And that would be it. Now test the launcher, and pray it would work. But it should work if you followed carefully.
Step 5: Creating an Autostart on Login Launcher (optional)
If you want to make Unicenta launch automatically upon user login, then you need this extra step. It’s a very simple step and will only require a minute of your time.
- Click on the the
Search your computerbutton. - Type
Startupto locate the startup menu. - Click
Startup Application. - Click
Addbutton. - Enter
Unicenta Auto LaunchunderNamefield. - Under
Commandfield, browse to your Unicenta Installation Path, and then chooselauncher.sh– this is the file created to get around the “Shortcut Not Working” issue. - Under
Commentfield, you enterAutolaunch Unicenta upon login. - Finally, click the
Addbutton, then close the dialog box.
Now, reboot your system to test. Unicenta should be able to start automatically upon user login.
Reference Image:

Initial step in creating Unicenta Auto Launch on Login
It’s a Wrap!
If you followed this guide carefully, then you should be able to launch your instance of Unicenta 3.91. If not, then feel free to ask help using the comment section below.
In case you find this guide too technical for you, or you don’t have the time to do this by yourself but have the proper funds, then I would suggest that you try those readily available system on the cloud. It’s called Cloud POS System.
No instruction yet for Windows, and I don’t have any future plans. Why so? Because I don’t have Windows installed on my system. I can’t afford the License.
For Windows 7, 8, 10 users out there, I highly recommend that you use Ubuntu or Linuxmint for your POS system. Why so? Because installing Unicenta on Linux is way more quicker than on Windows. In addition to this, you don’t have to spend so much money just to run a POS software. It can run on Linux, which is free, so why not use Unicenta with Linux instead.